Chapter 1: Environment Setup and the Basics of Running Code
Preface
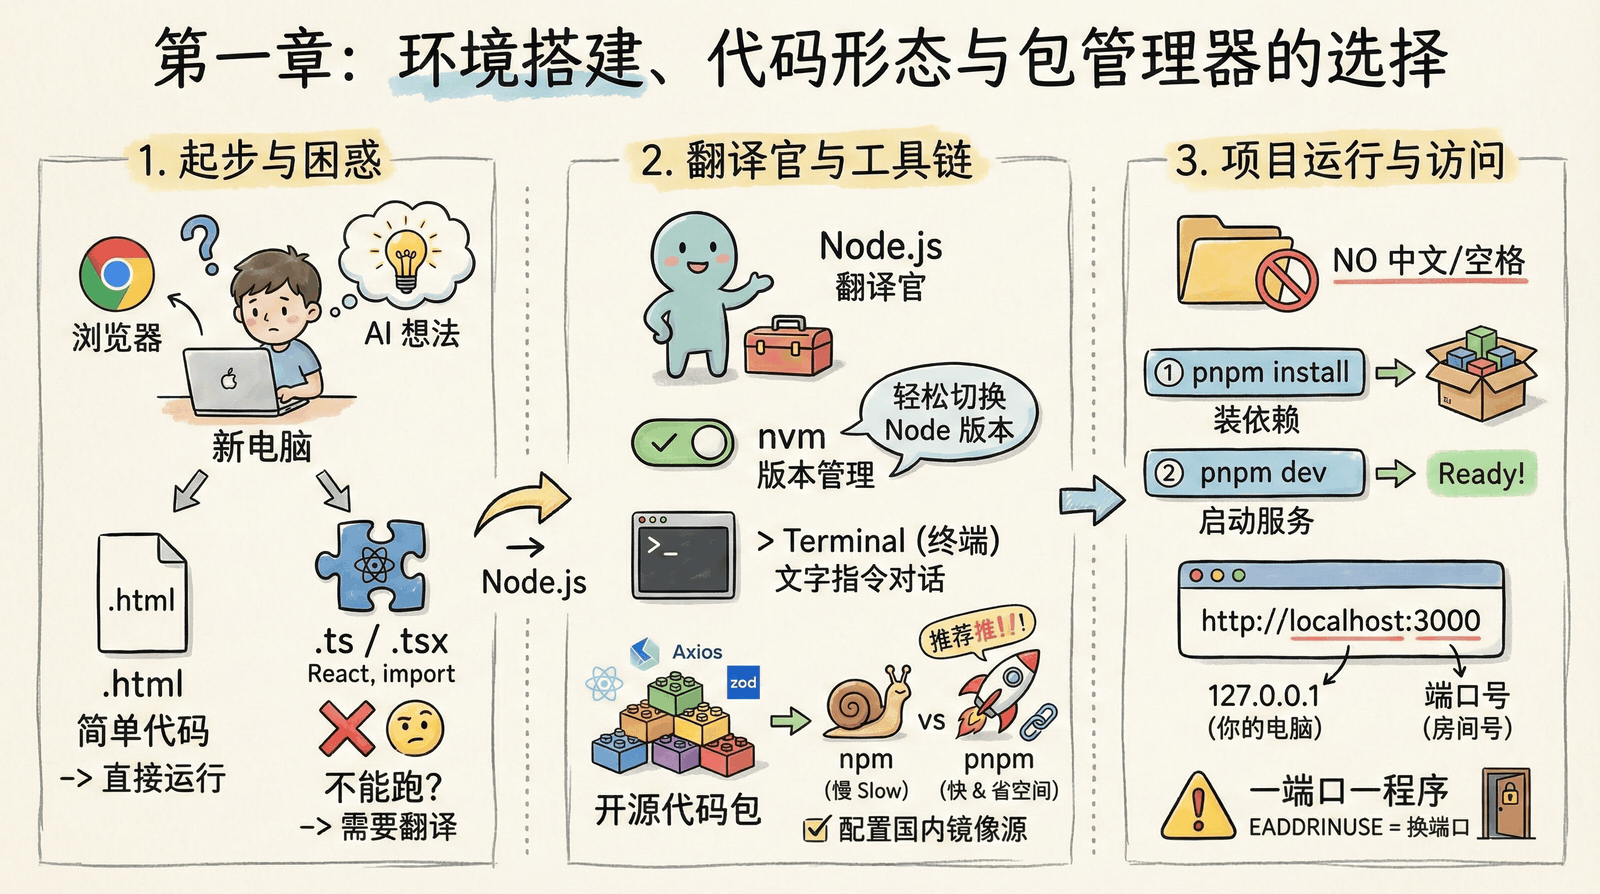
You have a brand-new computer. It’s completely clean, with nothing on it except a browser. You don’t know how to code, but you’ve noticed how hot AI is lately, and you have a brilliant app idea. You plan to direct AI through a web page to help you build a demo.
Want to jump right in? Check out 1.0 Quick Start to finish installing your environment in 5 minutes.
Code Formats
The first thing that confuses you is the format of the code AI outputs. Sometimes AI gives you a long block of code directly and tells you to save it as index.html. You do exactly that: create a file, paste it in, save it, double-click to open it, and a working web page actually appears in your browser. You’re thrilled and start to think programming is easier than you imagined. Files like this usually bundle structure (HTML), styling (CSS), and logic (JavaScript) all together, which makes them great for simple demos.
But when you ask for more complex features, AI starts giving you code with extensions like .ts or .tsx, and mentions terms like import and React. You save the file the same way as before and double-click it, only to find that it won’t open at all—or it just shows a bunch of code you can’t make sense of. Now you’re stuck: why won’t the code run anymore?
Confused, you ask: "If AI can already write code for me, why do I still need to learn this stuff?"
The old hand says: "AI can write code, but understanding how to make it run is still up to you. It’s like GPS: it can tell you the route, but you still need to know how to drive. Setting up your environment isn’t a hurdle—it’s the first step in working effectively with AI."
→ 1.1 How Code Formats Evolved will walk you from single-file HTML to modern modular development.
🎮 Click to try: Interactive demo
Below is a polished interactive demo featuring a counter, timer, and base conversion:
💡 This is what modern frontend development feels like: polished interfaces, smooth animations, and rich interactions. Use the keyboard shortcuts ↑↓ to adjust values, R to reset, and H to toggle history.
TypeScript and Node.js
The old hand tells you this is because modern development uses TypeScript (or TS for short). It’s stricter than plain JavaScript and better suited for large projects. But browsers can’t understand TS directly—they need a "translator" (a compiler) to turn TS into JavaScript the browser can understand. That compiler, along with the build tools, needs a Node.js environment to run. Without Node.js installed, your computer can’t run these modern code build tools.
→ 1.2 Understanding the Tech Stack and 1.3 Browser and Server Basics will help you build that understanding.
nvm Version Management
You excitedly go to download Node.js, but the old hand—just like the Node.js official website—stops you. He recommends installing nvm (Node Version Manager) instead. Because Node.js updates frequently and different projects may require different versions, nvm lets you switch versions easily without uninstalling and reinstalling over and over again. Through nvm, you install the latest LTS (Long-Term Support, stable) version, and following the old hand’s advice, you also switch to a domestic mirror source (to fix slow download speeds). At last, you have what people call a runtime environment.
→ 1.4 Terminal Basics will teach you the basics of the command line, and 1.5 Package Management and Project Configuration will guide you through these setup steps.
🔄 Click to try: Node version manager
Try switching between different Node.js versions and experience how convenient nvm is:
nvm list查看版本nvm use 22切换版本nvm install 20安装版本💡 Practice: Click different versions to switch between them and observe how the current version changes. Try installing a version that isn’t installed yet.
🎯 Core concept: nvm lets you manage multiple Node.js versions on the same computer, so different projects can use different versions without conflicts.
Terminal Basics
Next, you come into contact with the Terminal (such as Windows CMD, PowerShell, or Mac Terminal). It’s not some mysterious hacker tool—it’s simply a way to talk directly to the operating system through text commands. Compared with clicking icons using a mouse, the terminal can execute complex tasks more precisely and more quickly.
The moment most likely to make beginners panic is pressing Enter after a command and seeing command not found. But this error actually has a standard troubleshooting approach: first check the command spelling, then confirm whether the tool is installed, and finally make sure you’re in the correct directory. Building this troubleshooting mindset matters more than memorizing specific error messages.
🖥️ Click to try: Terminal Pro
Try entering commands in the professional terminal simulator below:
help 查看可用命令💡 Practice: Try entering
lsto view files, then entercd Documentsto switch directories, and usepwdto see the current path.🎨 Color guide: Blue = folder, green = executable file, cyan = link, white = regular file
⌨️ Shortcuts:
Tabautocomplete |↑↓command history |Ctrl+Lclear screen |Ctrl+Ccancel
Open Source Packages
Now that the environment is ready, the old hand tells you that modern software development rarely starts completely from scratch. Just like you don’t need to fire your own bricks to build a house, you can directly use code contributed by programmers around the world—that is, open source packages. React helps you build interfaces, Axios handles network requests, Day.js works with time, and Zod validates data... These ready-made packages let you focus on business logic instead of reinventing the wheel.
📦 Click to try: Open source package ecosystem
Explore commonly used open source packages in the npm ecosystem:
reactUI 框架next全栈框架vueUI 框架axiosHTTP 请求lodash工具库dayjs日期处理zod数据验证tailwindcssCSS 框架@tanstack/query数据管理prismaORMtypescript开发工具vite构建工具eslint代码质量prettier代码格式化shadcn/uiUI 组件motion动画express后端框架hono后端框架trpcAPIzustand状态管理💡 Practice: Click categories to filter different types of packages, then click cards to view details and simulate installation.
🎯 Core concept: npm has more than 2 million open source packages covering nearly every development need, dramatically speeding up development.
The pnpm Package Manager
So how do you install code packages written by others? You need a package manager. Node.js comes with one called npm, but it installs dependencies by copying them, which can take up a lot of disk space. These days, pnpm is more strongly recommended—with hard link and symbolic link technology, it can save about 50%-70% of disk space, and installation is significantly faster.
In AI development, you’ll frequently create new projects to explore different directions, and pnpm can save you a lot of waiting time and storage space.
→ 1.5 Package Management and Project Configuration explains in detail how nvm and pnpm work.
📦 Click to try: pnpm installation process
See how pnpm installs project dependencies:
💡 Practice: Click the "Install" button and watch the four steps pnpm uses to install dependencies.
🎯 Core concept: pnpm shares dependencies through hard link technology, saving 50%-70% of disk space compared with npm.
Models and Tools
Once the environment is installed, you’re holding a huge list of tools in your hands. Faced with all kinds of models, editors, and CLI tools, you feel completely overwhelmed.
After the old hand explains it, you finally understand: models determine the speed and upper limit of coding ability, while tools determine the method and efficiency of implementation.
When it comes to models, you might think that since Claude is the most capable, you should just use it for everything. But the old hand reminds you: domestic models are cheaper and faster to access. Take GLM as an example: the total available monthly usage can reach tens of billions to hundreds of billions of tokens, making it extremely cost-effective overall. This awareness of cost is very important in AI-native development—otherwise, once you scale up, the bill may shock you.
→ 1.6 Models and Tools will introduce the selection and configuration of different development tools in detail.
Folder Naming
Now you have a complete modern development environment and can handle any AI-generated TS code. The old hand gives you one special warning: when creating a new project, always use a folder name that does not contain Chinese characters or spaces. That’s because many low-level development tools have poor support for non-English characters, and Chinese paths are often the root cause of all kinds of strange errors.
→ 1.7 Creating a Project will teach you everything from folder naming conventions to creating a project template.
📁 Click to try: Project file structure
Explore the file structure of a typical project and learn the naming conventions:
my-project使用英文连字符my_project使用下划线我的项目避免中文my project避免空格💡 Practice: Click folders to expand/collapse them and inspect the project structure. Pay attention to the naming convention notes at the bottom.
⚠️ Important reminder: Folder and file names should avoid Chinese characters and spaces to prevent tool errors.
Localhost and Ports
The code is all on your local machine now, but you still have no idea how to actually run it. Hesitantly, you send the files to AI and ask: "How do I start this project?" AI tells you to first run pnpm install to install dependencies, and then run pnpm dev to start the development server. You type it all in, and the screen finally stops at http://localhost:3000.
You stare at this address, and the old hand gives you a quick lesson in networking basics: Localhost is 127.0.0.1, which represents "your own computer" in the world of networking. If your computer were a building, the IP would be the building’s address, and the port would be the specific room number. At this moment, your web app is sitting in room 3000, waiting for your browser to knock on the door.
Excitedly, you click the link, and the web page really appears! The old hand casually adds that although today’s development tools are very smart—if you start another project, they’ll usually move on automatically to room 3001—in production environments, the rules are strict: only one program can occupy a port at a time. If you see a red error like EADDRINUSE, don’t panic—just have AI switch to another port for you.
→ 1.8 Localhost and Ports explains these networking basics in detail.
🌐 Click to try: Localhost and port visualization
Choose an available port and experience the localhost connection process:
pnpm dev 时,可指定端口如 --port 3002💡 Practice: Click a green available port, then click the "Connect" button. Try clicking a red occupied port and see what happens.
🎯 Core concept: localhost (127.0.0.1) represents your own computer, and the port number is the app’s "room number".
Hands-on Practice
Once your environment is set up, create a folder with an English name and tell your AI tool: "Help me create a Next.js project here." Then follow its instructions to run the commands, and finally open localhost:3000 in your browser—and you’ll have officially stepped into the world of AI programming!