14.4 Configure a Domain and Certificate
Goal of this section: Point your domain to your server, apply for a free SSL certificate, and let users securely access your app through
https://yourdomain.com.
Xiaoming's app is up and running, but http://IP:3001 looks pretty ugly. He remembered what he learned in Ch13 about binding a domain—"This time it's an A record pointing to the VPS IP, not a CNAME pointing to the platform."
The experienced mentor said: "Binding a domain requires two things, and both are essential: DNS lets the domain find the server, and creating the website lets the server recognize the domain. If you only configure DNS without creating the website, the request reaches the server but nothing handles it; if you only create the website without configuring DNS, users can't find your server at all. In Ch13, using a CNAME was like call forwarding—the request was forwarded to the platform to handle it for you. This time, using an A record is like direct dialing—you call the server's IP directly, so you have to configure both ends yourself."
Step 1: DNS A records — let the domain find the server
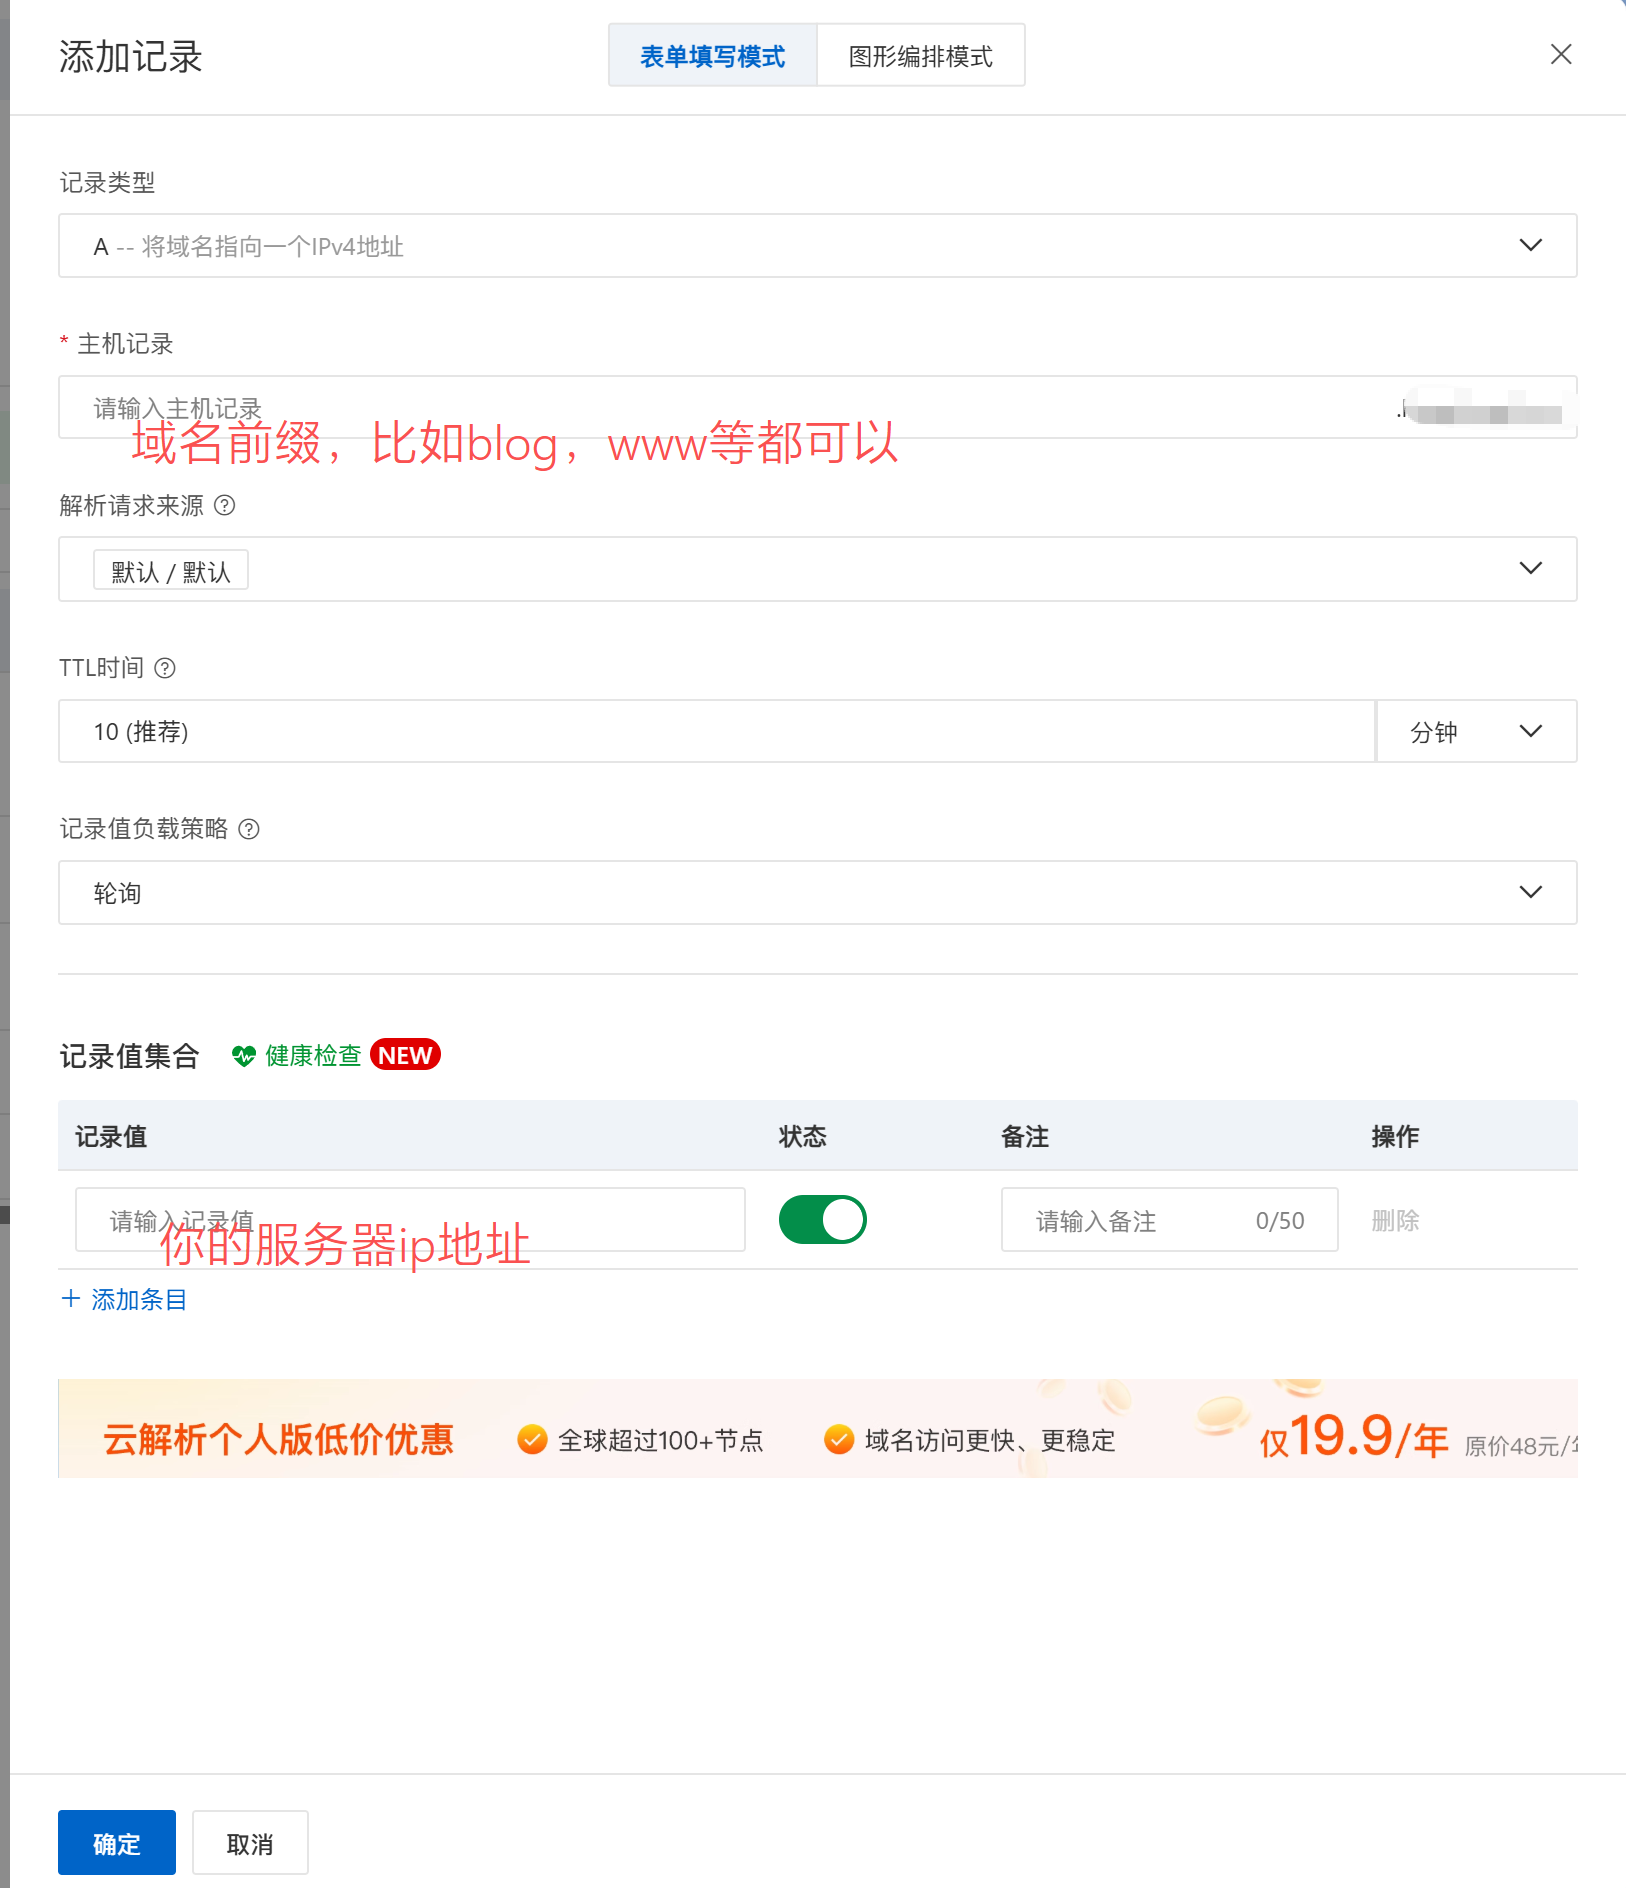
In the DNS management page of your domain provider (such as Alibaba Cloud, Cloudflare, or Tencent Cloud), add an A record. The purpose of this step is to tell the global DNS system: "This domain corresponds to this IP."
| Record Type | Host | Value | TTL |
|---|---|---|---|
| A | @ | Your server's public IP | 600 |
| A | www | Your server's public IP | 600 |
@represents the root domain (such asyourdomain.com)wwwrepresentswww.yourdomain.com
Xiaoming opened the DNS management page of his domain registrar and added two A records according to the table. The operation itself was very simple—choose the type, fill in the host, fill in the IP address, and it was done in a few seconds. But he still felt a little unsure: "Is that it? Will the domain really point to my server?" 
DNS propagation takes time
After adding the records, it usually takes anywhere from a few minutes to a few hours to take effect (depending on the TTL setting and DNS cache in different locations). You can use the following commands to check whether it has taken effect:
# Run on your computer
nslookup yourdomain.com
# or
ping yourdomain.com
# or (more detailed)
dig yourdomain.com
If the returned IP is your server's IP, it means DNS has already taken effect.
If it still hasn't taken effect after 24 hours:
- Check whether the DNS records are correct (host, value)
- Confirm that the domain status is normal (not expired, not locked)
- Try clearing your local DNS cache:
ipconfig /flushdns(Windows) orsudo dscacheutil -flushcache(Mac)
Step 2: Create the website — let the server recognize this domain
DNS solves the problem of "the domain finding the server," but after the server receives the request, it still needs to know where to send it. Creating a website in 1Panel (which you already did in earlier sections) and filling in the primary domain tells OpenResty: "When a request for this domain comes in, hand it to me."
If you already entered the domain when creating the website in 14.3.2 or 14.3.3, then this step is already done. If you used the IP for testing at the time, now go to the "Website" page in 1Panel, edit the corresponding site, and add the domain.
Be sure OpenResty is installed from the app store. 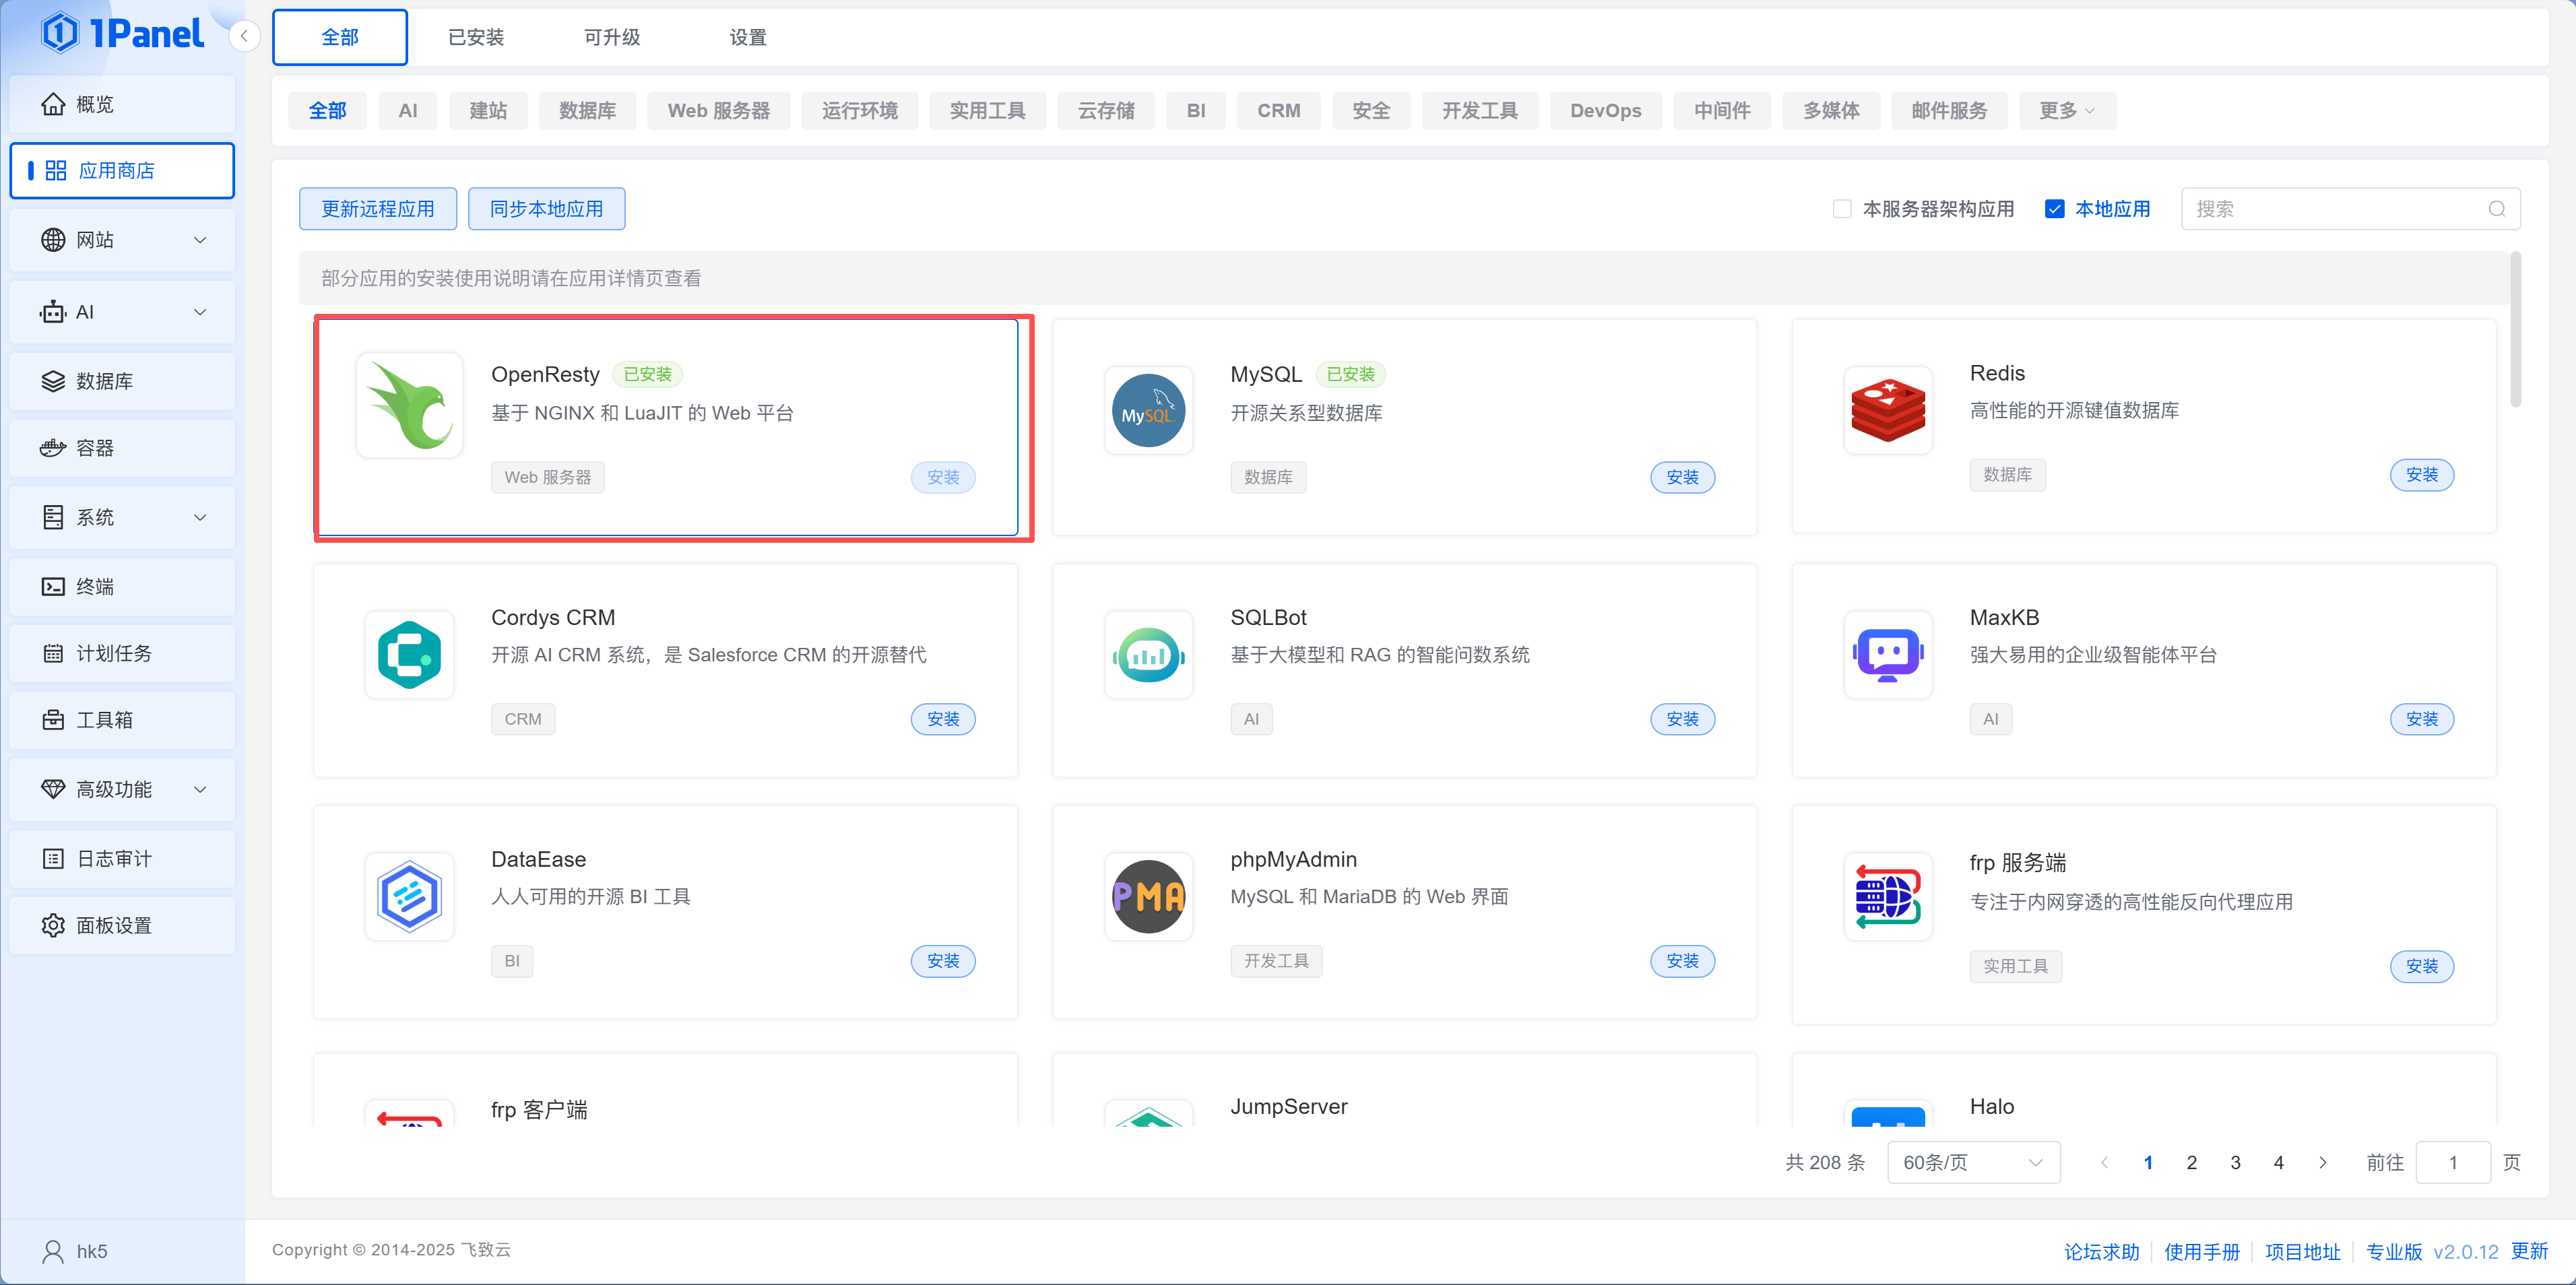
After the configuration is complete, make sure your security group has 80 (HTTP) and 443 (HTTPS) ports open. Then visit http://yourdomain.com in your browser. If you can see your website, your domain configuration was successful.
After adding the A records, Xiaoming couldn't wait to type the domain into his browser—but the page failed to load. He thought he had configured something wrong, but the mentor told him to wait: "DNS doesn't take effect instantly. DNS servers in different regions need time to sync." A few minutes later he tried again, and the page appeared. He tested it on his phone too, and it opened there as well. "My website finally has its own domain name now, instead of just a string of IP and port numbers."
Step 3: Apply for a free Let's Encrypt SSL certificate
Right now your site is still using HTTP, and the browser will show a "Not Secure" warning. We need to apply for an SSL certificate to enable HTTPS.
Xiaoming remembered that when deploying on Vercel, a single vercel deploy took care of everything—domain, HTTPS, CDN, all configured automatically. Now on a VPS, every step has to be done manually. "That's the price of managing your own server, but it's also the price of freedom."
In 1Panel, go to "Website > Certificate" and click "Apply for Certificate." Enter the domain, choose HTTP verification as the validation method (the simplest option, as long as port 80 is accessible), enable "Auto Renew," and click Confirm. You can leave the ACME account as the default "Automatically generated by 1Panel."


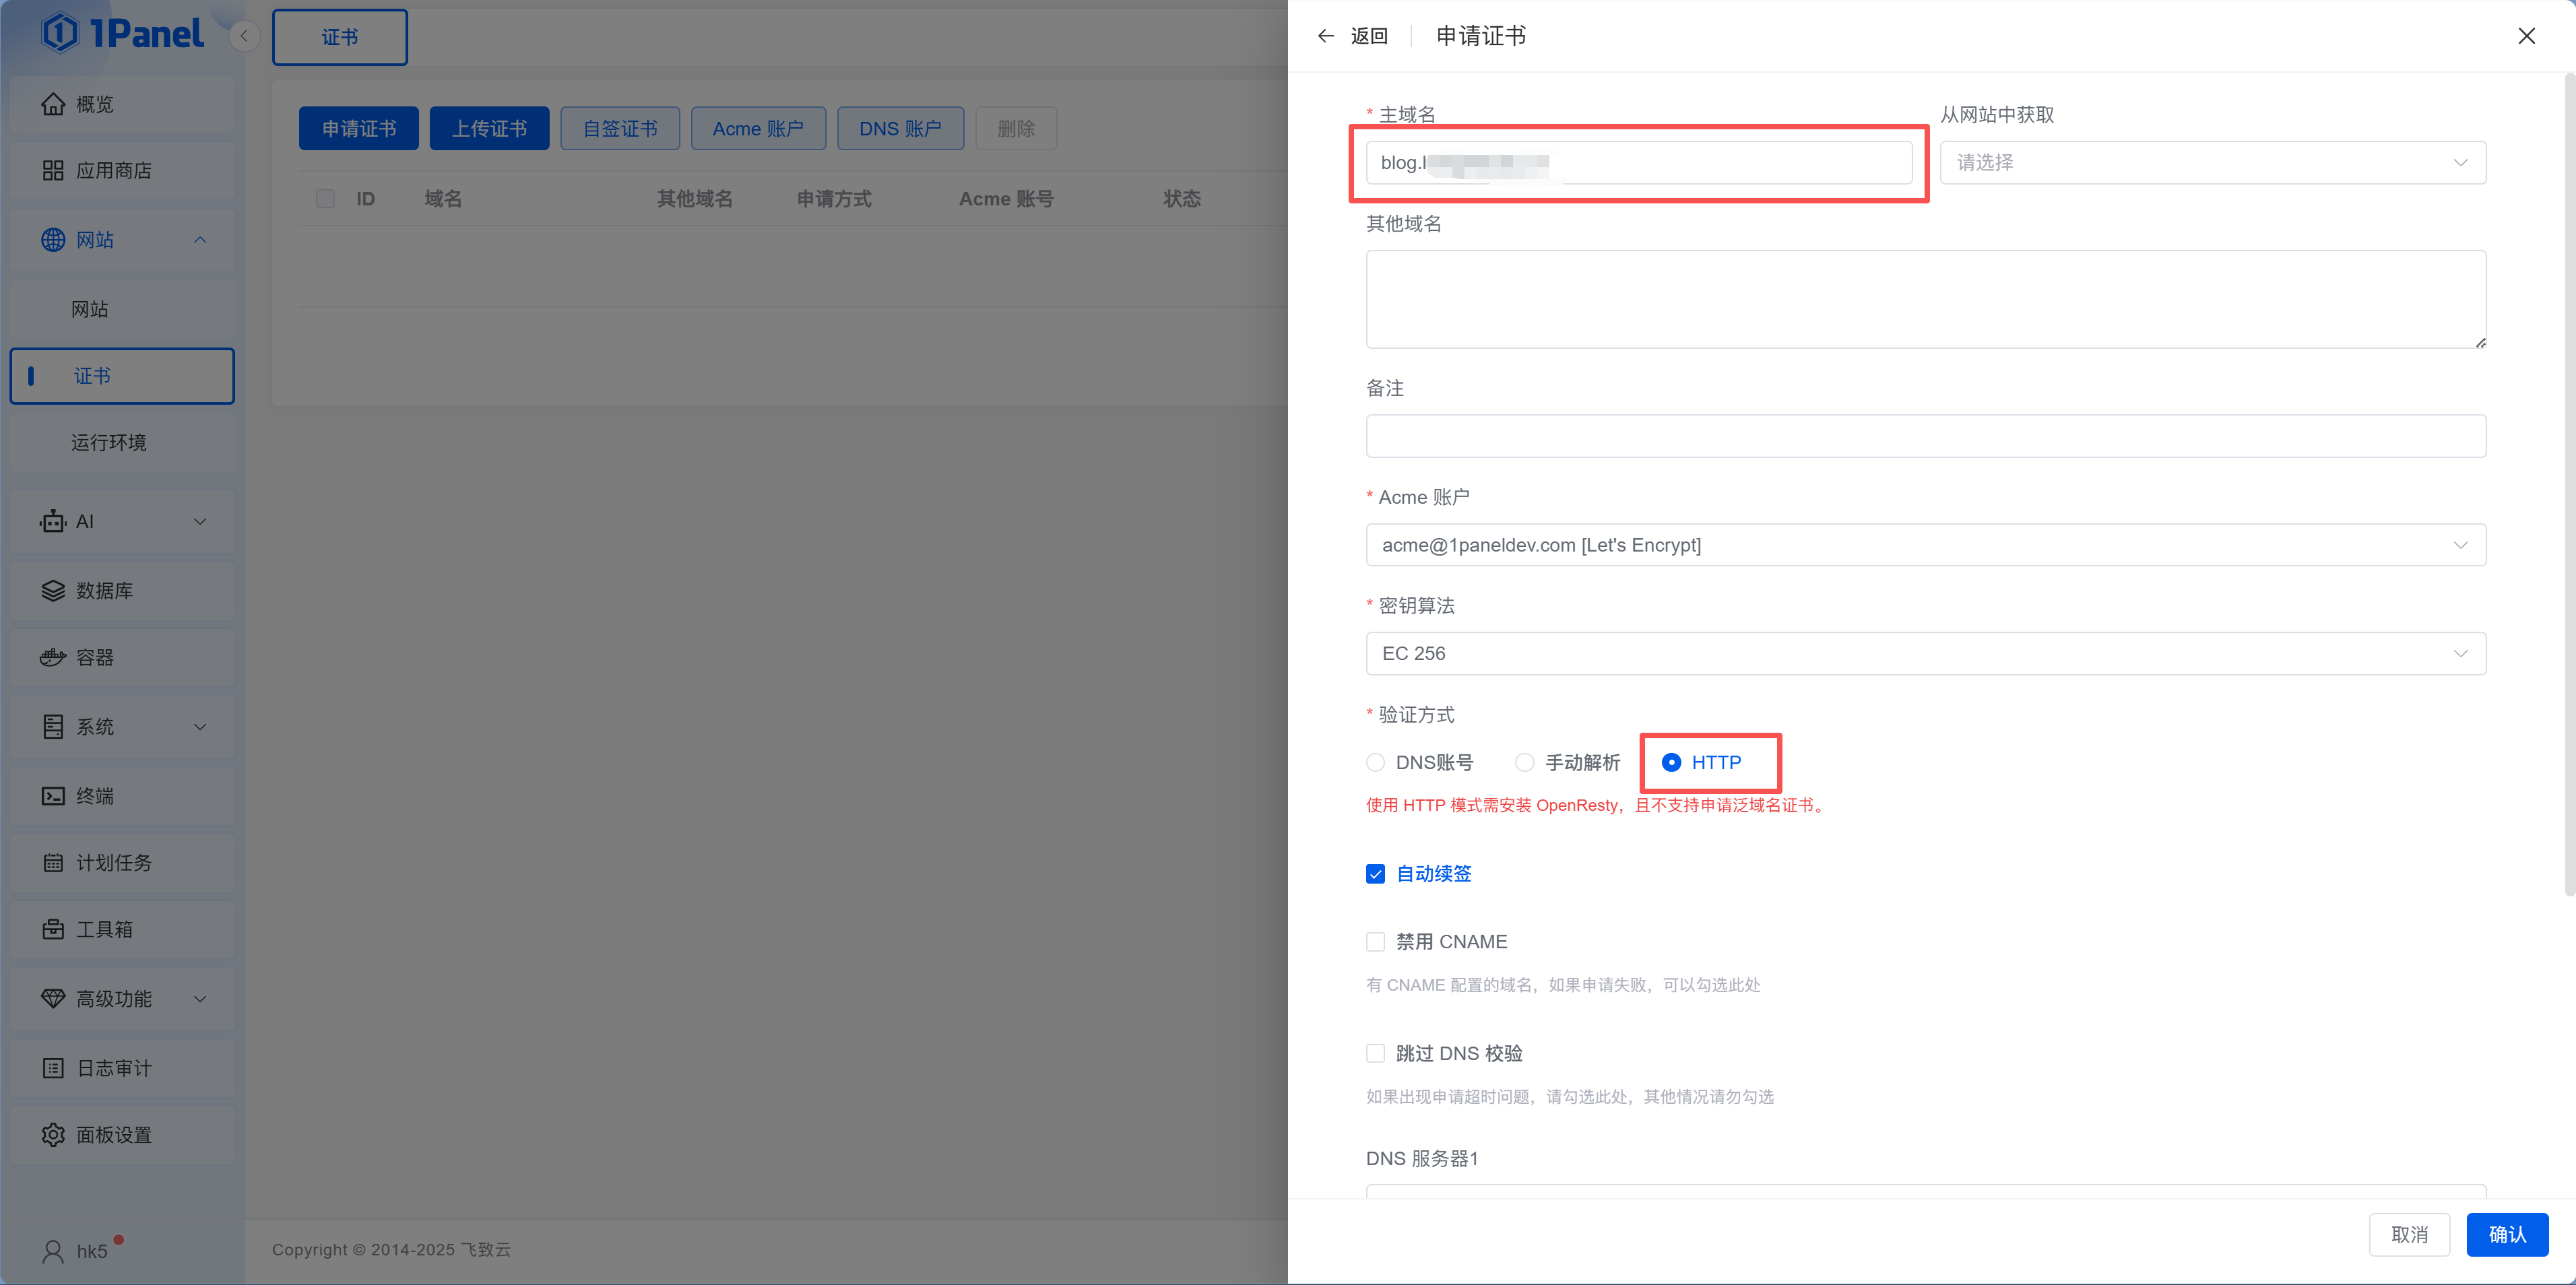
Wait about a dozen seconds. Once the status changes to "Issued," go back to the website configuration page, select the certificate you just applied for in the HTTPS settings, and enable it.
What is Let's Encrypt?
As covered in Ch13, Let's Encrypt is a free, automated certificate authority used by hundreds of millions of websites worldwide. Certificates are valid for 90 days, but they can be renewed automatically. The difference from Ch13 is that the certificate was managed by the platform that time, while this time the certificate lives on your own server.
Xiaoming clicked "Apply for Certificate" on the "Website > Certificate" page, entered the domain, chose HTTP verification, enabled auto-renewal, and clicked Confirm. About a dozen seconds later, the status changed to "Issued." He went back to the website configuration page, enabled HTTPS, selected the certificate he had just applied for, and refreshed the site—the address bar changed from "Not Secure" to a little lock icon. "Just like the green lock in Ch13, but this time the certificate is on my own server."
Step 4: Force HTTPS redirection
After enabling HTTPS, your website supports both HTTP and HTTPS access. But we want all HTTP requests to automatically redirect to HTTPS.
On the website HTTPS settings page in 1Panel, find "HTTP Options" and choose "Automatically redirect HTTP access to HTTPS".
HTTP options explained
1Panel provides three HTTP options:
- Automatically redirect HTTP access to HTTPS: Recommended option. All HTTP requests are automatically redirected to HTTPS
- Direct HTTP access allowed: Both HTTP and HTTPS are available, with no forced redirection
- Disable HTTP: Only HTTPS access is allowed, and HTTP requests are rejected directly
After enabling it, when users visit http://yourdomain.com, they will be automatically redirected to https://yourdomain.com, and the address bar will show a little lock icon.
Xiaoming deliberately typed a URL starting with http:// into the browser's address bar. After pressing Enter, it automatically redirected to https://. He also tried the address without www, and it redirected properly too. "Every entry point works now. No matter how users type it, they'll end up on an encrypted, secure connection."
Step 5: Automatic certificate renewal
A Let's Encrypt certificate is only valid for 90 days. If the certificate expires, users will see a full-screen red browser warning page saying "Your connection is not private" when opening your website, and most people will just close it. Fortunately, if you checked "Auto Renew" when applying for the certificate, 1Panel will automatically renew it for you before it expires (both HTTP verification and DNS account verification support automatic renewal). You can also manually trigger renewal by clicking the "Apply" button in the certificate list.
Common reasons certificate renewal fails
- Port 80 is occupied or blocked: Let's Encrypt's HTTP verification requires access to port 80
- DNS resolution changed: The domain no longer points to this server
- Firewall rules changed: The security group closed port 80
If automatic renewal fails, 1Panel will show an alert on the panel. Just manually click the "Apply" button in the certificate list to retry.
Multi-domain and wildcard certificates
If you have multiple subdomains (such as api.yourdomain.com and docs.yourdomain.com), you need to apply for a separate certificate for each one. A wildcard certificate can handle all subdomains at once:
Option 1: Apply for a separate certificate for each subdomain
The simplest approach. Each website independently manages its own certificate.
Option 2: Apply for a wildcard certificate
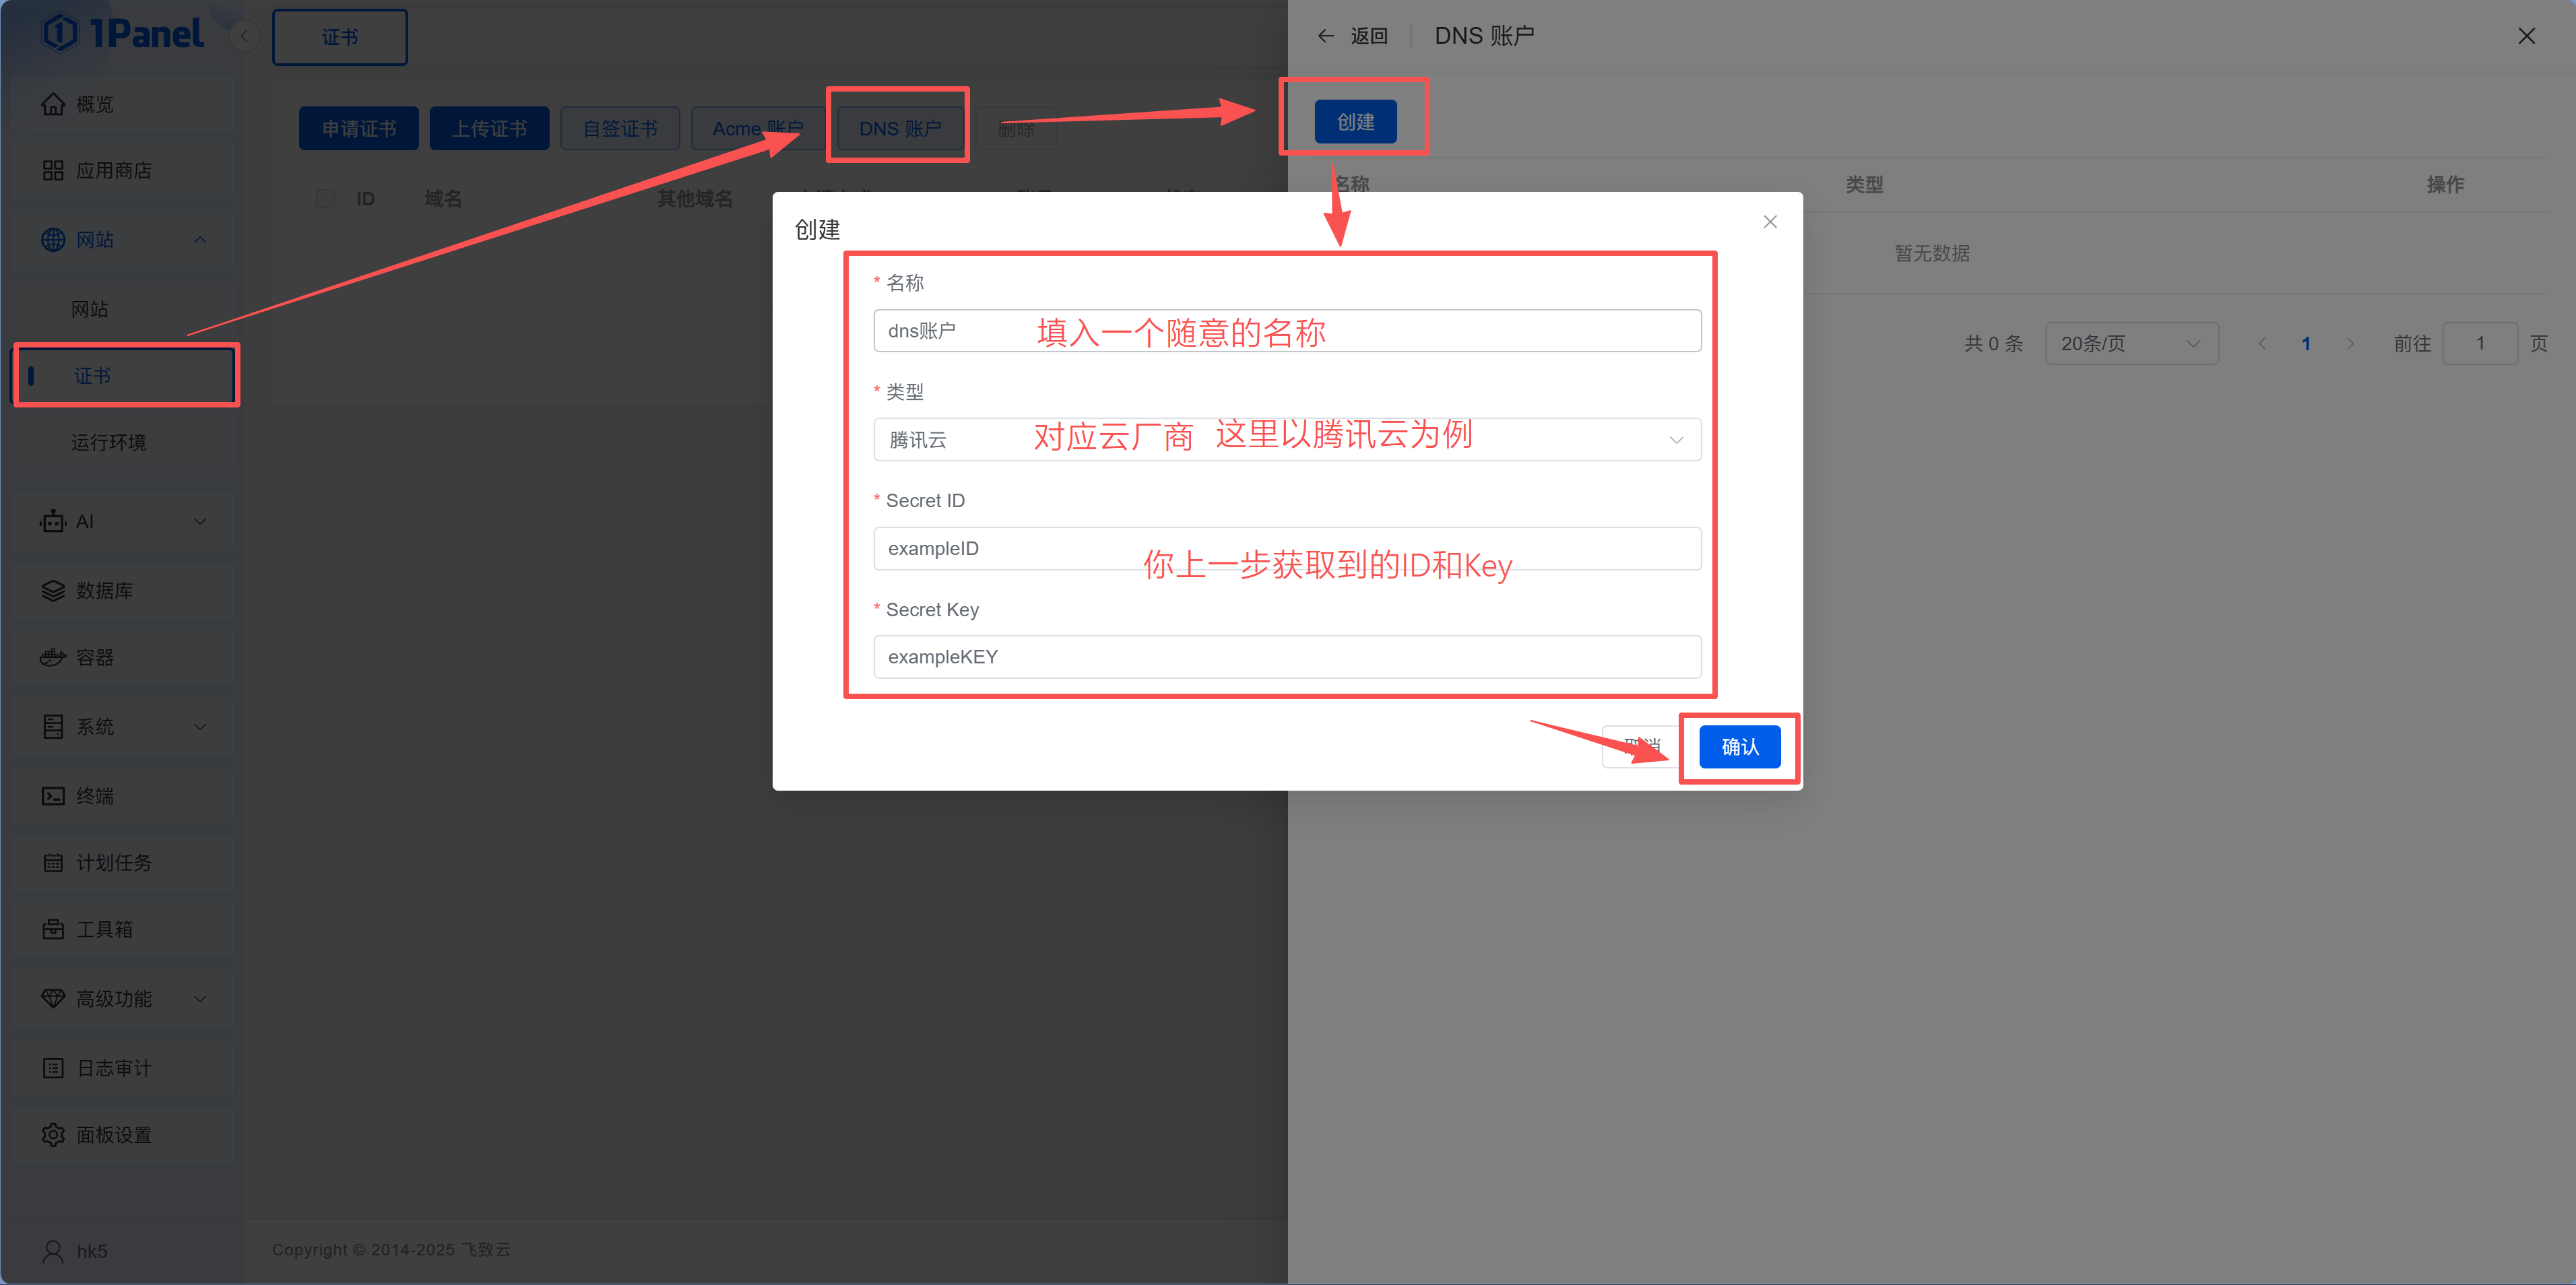
One certificate covers all subdomains under *.yourdomain.com. This requires DNS verification (instead of HTTP verification):
- In "Website > Certificate > DNS Account," add the API key for your domain provider (such as Alibaba Cloud AccessKey or Cloudflare API Token)
How do I get the API key from my DNS provider?
Alibaba Cloud:
- Log in to the Alibaba Cloud console
- Top-right avatar → AccessKey Management
- Create an AccessKey (AccessKey ID + AccessKey Secret)
- Fill in these two values in 1Panel
Cloudflare:
- Log in to the Cloudflare Dashboard
- Top-right avatar → My Profile → API Tokens
- Create a Token and choose the "Edit zone DNS" template
- Fill in the Token in 1Panel
Tencent Cloud:
- Log in to the Tencent Cloud console
- Top-right avatar → Access Management → API Key Management
- Create a key (SecretId + SecretKey)
- Fill in these two values in 1Panel
- When applying for the certificate, enter
*.yourdomain.comas the domain, choose "DNS verification" as the validation method, and select the DNS account you just added
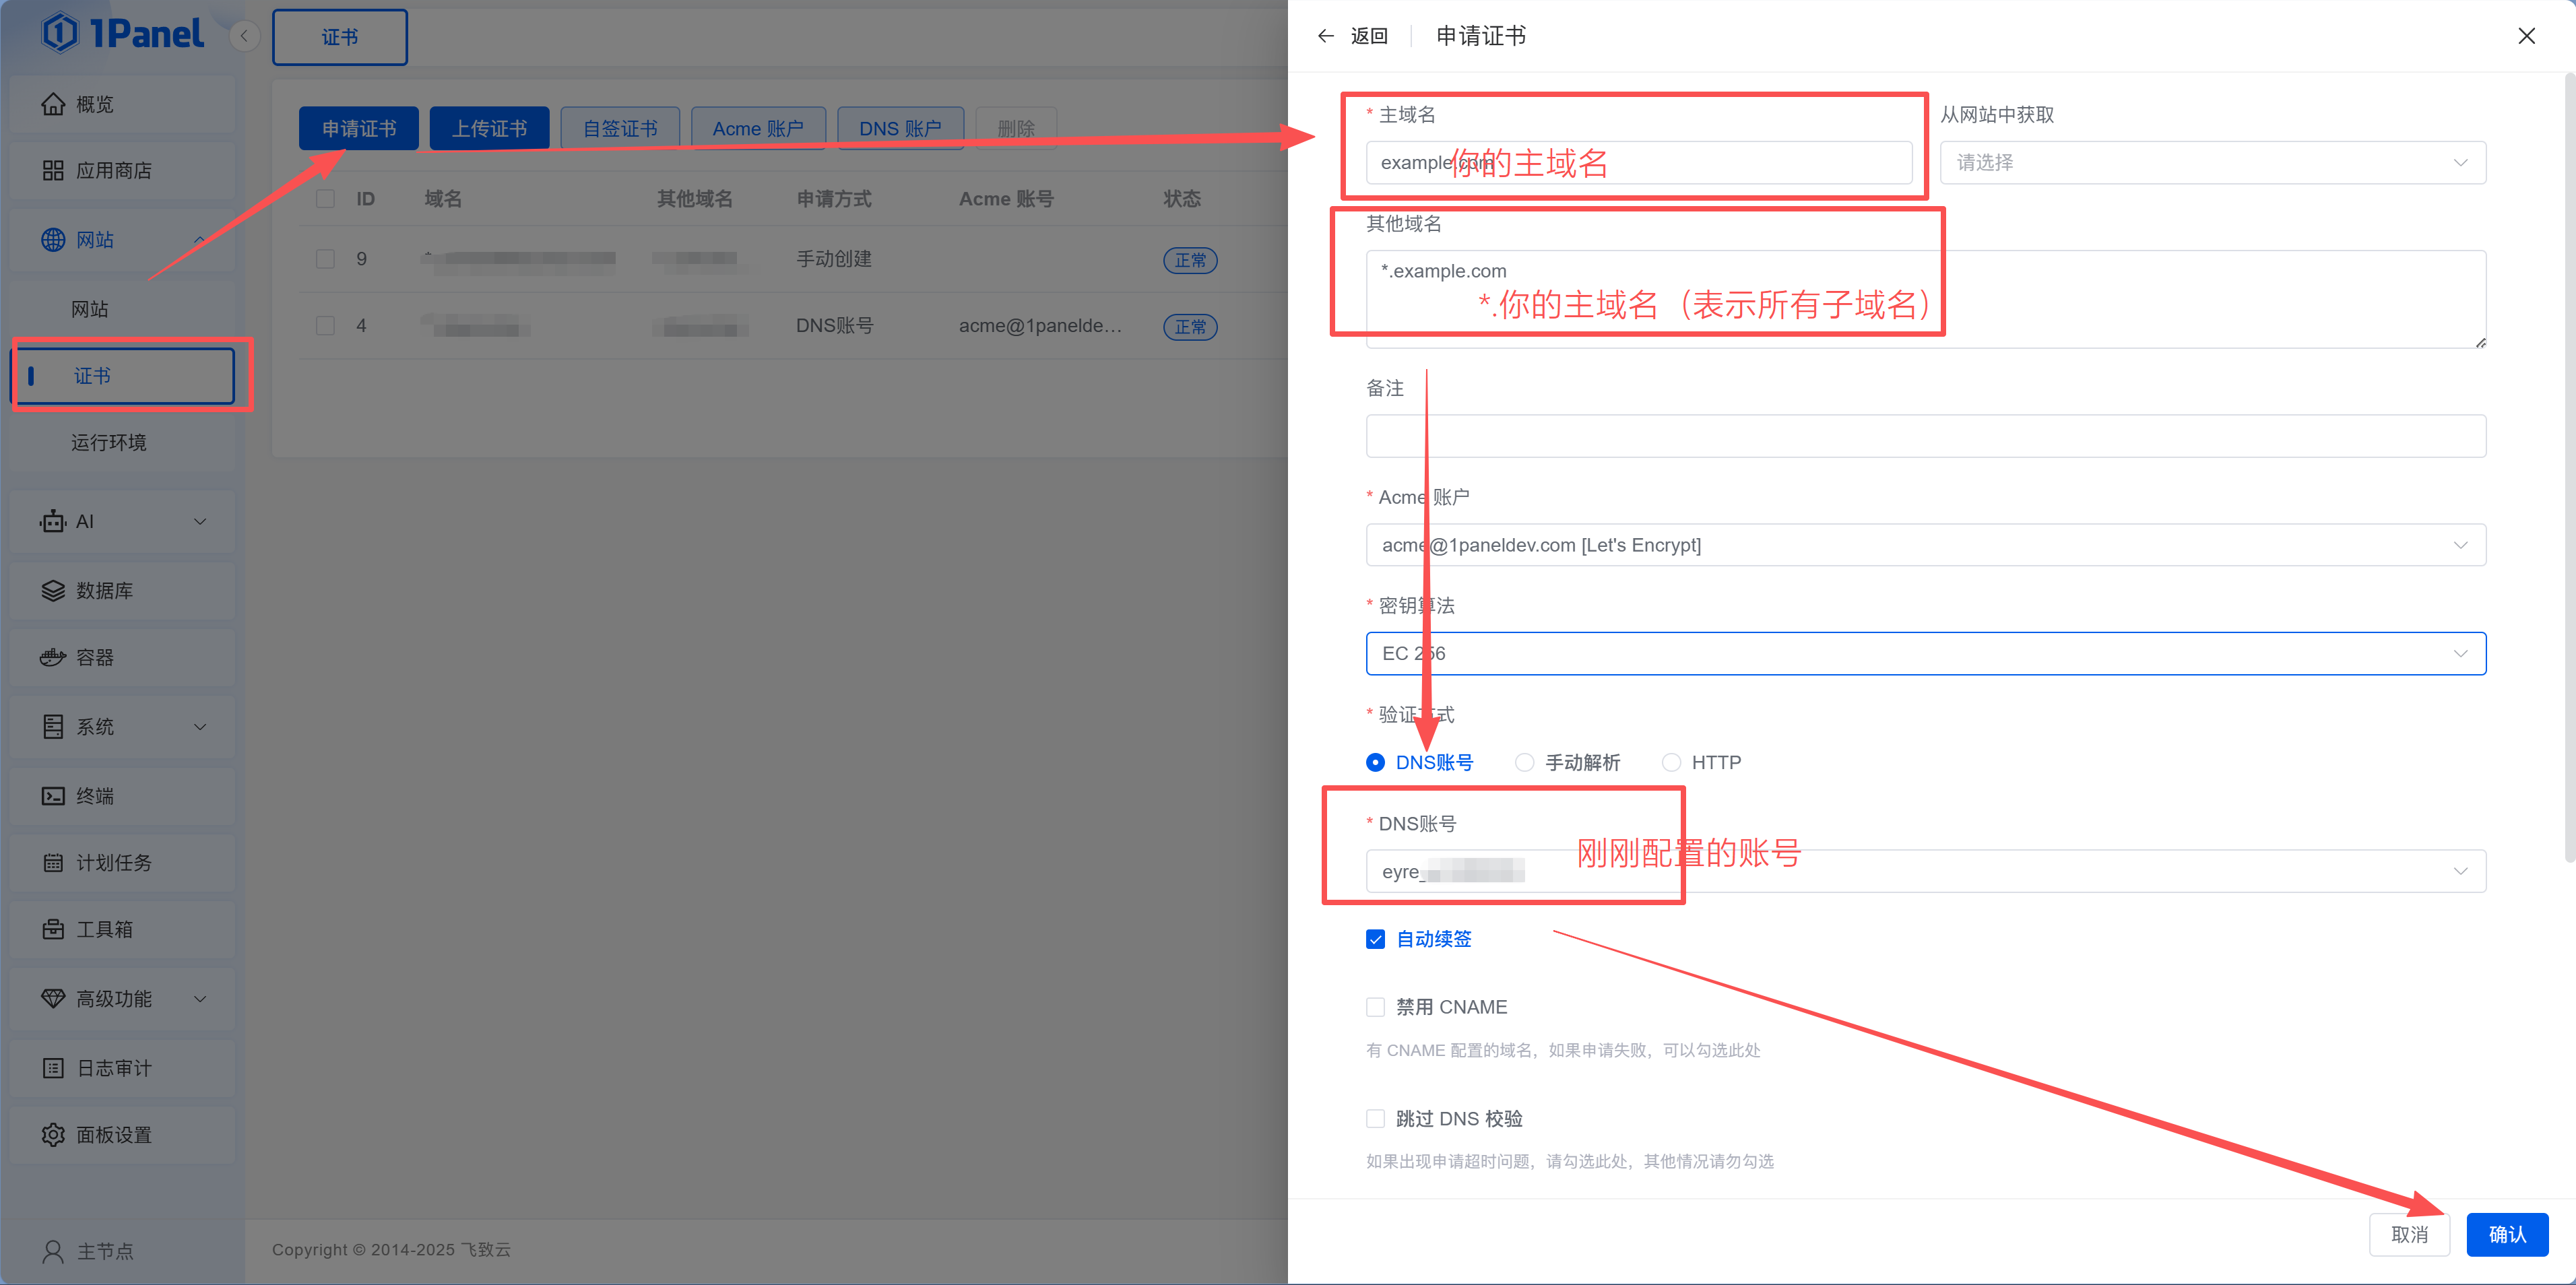
- 1Panel will automatically add a TXT record with your domain provider to complete verification. Just wait for issuance
| Certificate Type | Coverage | Validation Method | Best For |
|---|---|---|---|
| Single domain | yourdomain.com | HTTP / DNS both supported | Only one domain |
| Multi-domain | Several specified domains | HTTP / DNS both supported | 2-3 domains |
| Wildcard domain | *.yourdomain.com | DNS verification only | Many subdomains |
Next step
Your domain and HTTPS are all set up, and your website is now a "real" production product. Next, let's see what other fun apps you can run on your server—14.5 Other Fun Apps.