14.3.2 Deploying Next.js Applications
Goal for this section: Use 1Panel's runtime environment feature to deploy your Next.js project to a server and successfully access it.
Xiaoming opened 1Panel's runtime environment configuration page and saw there weren't many form fields—"Simpler than Vercel?"
The old hand said: "Pretty much. Deploying on your own server means manually going through what Vercel does for you—just fill in a few key fields."
Prerequisites
Make sure you've completed:
- Installed 1Panel on your server (refer to 14.2)
- Installed OpenResty and PostgreSQL through the App Store (if your project needs a database)
- Pushed your project code to GitHub
Step 1: Upload Code to Server
Creating a runtime environment requires specifying a "Project Directory," so you need to upload your project code to the server first. Common methods:
- Git Clone: SSH into the server and
git cloneyour repository to a designated directory - 1Panel File Manager: Use the panel's "Files" feature to upload a zip archive and extract it
# After SSH login, clone code to designated directory
cd /opt
git clone https://github.com/your-username/your-project.git

# Enter project directory and install dependencies first
cd your-project
pnpm install
For private repositories, you'll need to configure GitHub access credentials (Personal Access Token) or SSH Key.
Public repositories are easier
If your project doesn't contain sensitive information (which should be in environment variables, not code), making the repository Public saves you the credential configuration steps.
Step 2: Understanding Port Mapping
Before creating a runtime environment, understand this key concept: port mapping.
Your Next.js application runs inside a Docker container, listening on port 3000 by default. But containers are isolated—when external users access your server IP, they can't reach port 3000 inside the container. You need to configure port mapping: open an external port on the server and forward traffic to port 3000 in the container.
User access → ServerIP:3001 → Forward to → Container internal:3000 → Next.js appWhat is port mapping?
A building has one address but many rooms. A server has one IP, but different ports distinguish different applications—room 3001 is your website, room 3002 is the API, room 5432 is the database. Port mapping connects the external room number (external port) to the internal room number (container port).
Xiaoming was a bit confused here: "So I need to fill in two ports?" The old hand said: "Yes. The internal container port is 3000 (Next.js default), and the external server port is up to you, like 3001. When users visit 3001, traffic gets forwarded to port 3000 in the container."
Prerequisite: Solution for Insufficient Memory
If your VPS only has 1-2GB of memory, you may encounter out-of-memory errors (JavaScript heap out of memory) when building your Next.js project. The solution is to create a Swap partition (virtual memory):
# Create 2GB Swap file
sudo fallocate -l 2G /swapfile
sudo chmod 600 /swapfile
sudo mkswap /swapfile
sudo swapon /swapfile

# Set auto-mount on boot
echo '/swapfile none swap sw 0 0' | sudo tee -a /etc/fstab

# Verify Swap is active
free -h
After creating Swap, even if physical memory is insufficient, the system can use disk space to avoid build failures.
When do you need Swap?
- 1GB memory: Strongly recommend creating 2GB Swap
- 2GB memory: Recommend creating 1-2GB Swap
- 4GB and above: Usually not needed
Step 3: Create Runtime Environment
What is a runtime environment?
1Panel's "Runtime Environment" is essentially a Docker container. The configuration items you fill in the form—project directory, startup command, port mapping—all become parameters in docker-compose.yml. Understanding this makes the following configuration less unfamiliar.
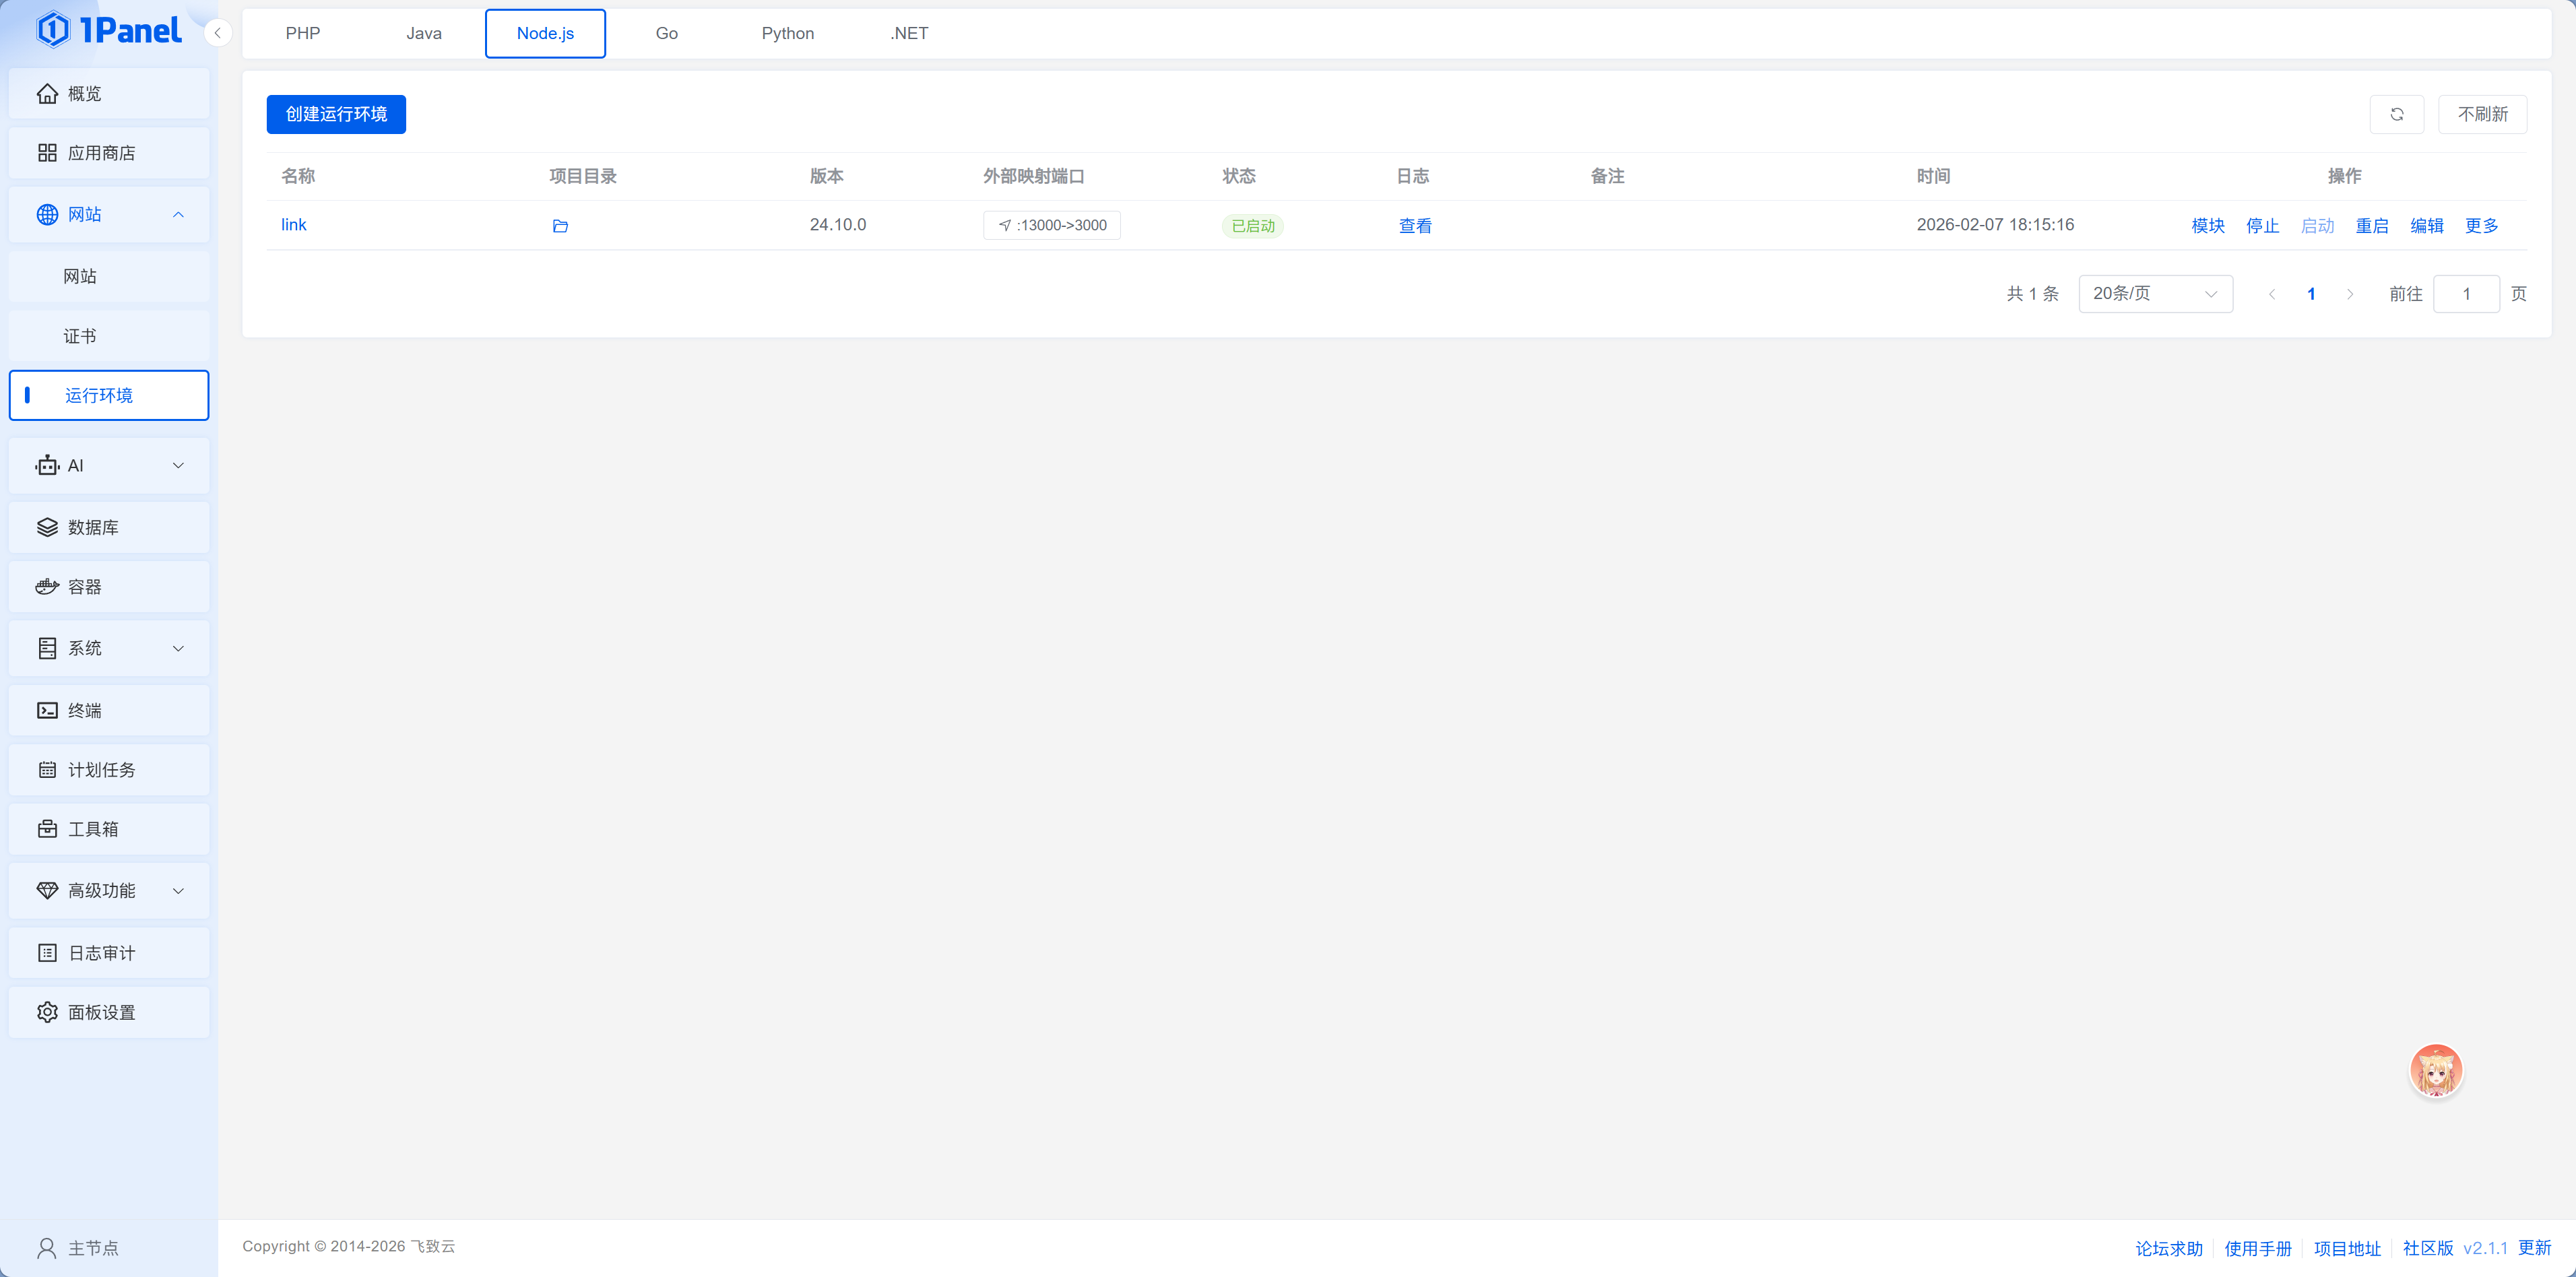
In the 1Panel dashboard, go to "Websites > Runtime Environments" and click "Create Runtime Environment." The form is divided into basic and advanced configuration sections.
Basic Configuration (key focus):
- Name: Give this runtime environment a name (e.g.,
my-nextjs-app) - Project Directory: Select the path where your code is located (folder icon on the right for visual selection)
- Version: Node.js version, defaults to a newer version, usually no need to change. If you use a specific version locally, choose the same one
- Startup Command:
git pull && pnpm build && pnpm start(see explanation below) - Container Name: Defaults to match the runtime environment name, used for container-to-container communication—when backend containers connect to databases, they find each other by container name
Advanced Configuration (visible after expanding):
- Port Mapping: Map container's 3000 to server's 3001 (see explanation below)
- Environment Variables: Add variables from
.envone by one (see explanation below)

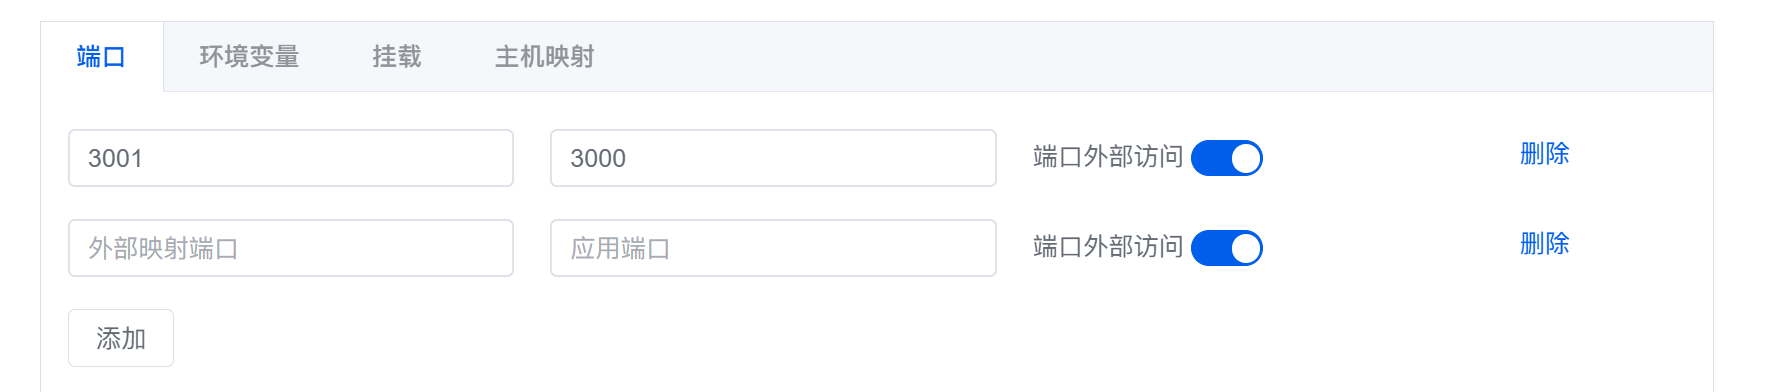
How to Configure Port Mapping
When creating a runtime environment, expand the "Advanced Configuration" section and find the port mapping area:
- Click "Add" button to create a new port mapping row
- Host Port fill in
3001(external server port, you decide) - Container Port fill in
3000(Next.js default port)
Server external port 3001 → Container internal port 3000This way, when users visit http://ServerIP:3001, traffic gets forwarded to port 3000 in the container, which is your Next.js app. If your project needs to expose multiple ports, continue clicking "Add" to configure more mappings.
After configuration, remember to open the corresponding external port (e.g., 3001) in your cloud provider's security group.

How to Fill in Startup Command
This is the most critical field in the entire form. 1Panel provides two modes:
- Auto-parse Mode (default): 1Panel reads your project's
package.json, parses commands defined inscripts(likedev,build,start), and displays them in a dropdown for selection - Custom Mode: Enable "Custom Startup Command" switch and manually enter any command. Suitable for scenarios requiring multiple chained steps
For Next.js projects, pnpm start only handles starting—it requires the project to already be built. So custom mode is recommended, chaining code pulling, building, and starting together:
git pull && pnpm build && pnpm startThis way, each restart automatically pulls latest code and rebuilds. To update deployment, just click "Restart" in the panel—no need to SSH into the server manually.
Dependency installation (pnpm install) is recommended to be done via SSH after uploading code (already done in Step 1), not included in the startup command—reinstalling dependencies on every restart is slow and unnecessary. If you add new dependencies later, just run pnpm install via SSH once.
Xiaoming hesitated at "Startup Command"—locally he used pnpm dev, but production should use pnpm start. The old hand reminded: "dev is development mode, enabling hot reload and debugging tools, poor performance and insecure. Always use start in production."
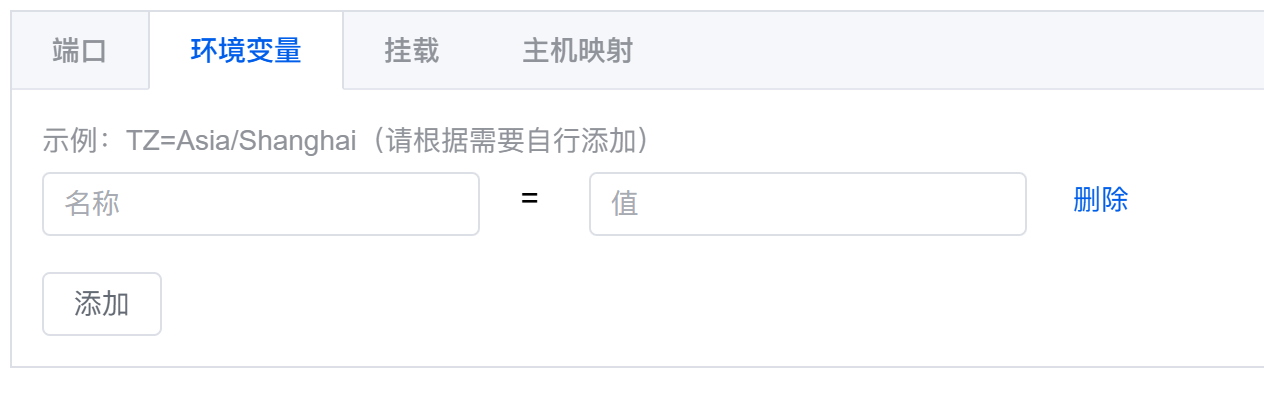
How to Fill in Environment Variables
Secure management of environment variables
Environment variables often contain sensitive information (database passwords, API keys, etc.). For how to securely manage these sensitive items, see Chapter 8 "Authentication & Security" in the "Environment Variables & Secret Management" section.
The environment variables area in the form is a key-value list—one "Key" and "Value" per row, click "Add" to create a new row, click the red trash icon to delete. Add variables from your local .env one by one:
# PostgreSQL connection (note hostname is container name)
DATABASE_URL="postgresql://username:password@1Panel-postgresql-xxxx:5432/database_name"

# Redis connection (if using Redis)
# With password
REDIS_URL="redis://:your_password@1Panel-redis-xxxx:6379"
# Without password
REDIS_URL="redis://1Panel-redis-xxxx:6379"

# Other environment variables
BETTER_AUTH_SECRET="your_secret_key"
BETTER_AUTH_URL="http://your_ip:port"
NODE_ENV="production"
Container naming conventions
1Panel-created database containers follow the format 1Panel-{database_type}-{4_random_letters}:
- PostgreSQL:
1Panel-postgresql-ukow(last 4 random) - Redis:
1Panel-redis-w94p(last 4 random) - MySQL:
1Panel-mysql-abcd(last 4 random)
You can check actual container names in the "Containers" page, or customize container names when creating databases.
Redis connection string format
Redis connection string format depends on whether a password is set:
- With password:
redis://:password@container_name:6379(note:followed by password) - Without password:
redis://container_name:6379(simply omit password part) - Specify database:
redis://container_name:6379/0(trailing/0means use database 0)
Xiaoming copied variables from his local .env file one by one. When filling DATABASE_URL, he almost wrote localhost again—remembering the lesson from the previous section, he quickly changed it to the PostgreSQL container name. He checked the "Containers" page to confirm: the container name was 1Panel-postgresql-ukow.
Click Confirm and Wait for Startup
After filling in all configurations, click "Confirm." 1Panel will execute code pulling, building, and starting according to your startup command. First startup will be slower—building Next.js may take several minutes, after all the server only has 2GB memory.
After Xiaoming clicked confirm, logs started scrolling—pulling code, building, starting, running for nearly two minutes, finally status turned green "Running."
To view runtime logs, click the "Logs" button for the corresponding environment in the "Websites > Runtime Environments" list.
Step 4: Access Your Application
After the application starts successfully, enter http://ServerIP:3001 (your configured external port) in the browser to see your app.
Xiaoming entered the address in his browser and saw his application page—"It's really running on my own server!" He tried registering an account, posting some data, refreshed the page, and the data was still there. Frontend, backend, database—all three parts working together on his own server.
Container Name vs localhost: Database Connections
This is the most error-prone part of deployment, worth emphasizing again:
| Where your code runs | What to put in DATABASE_URL |
|---|---|
| In Docker container (1Panel runtime environment) | Use container name, e.g., postgresql |
| On server host (SSH manual run) | Use localhost or 127.0.0.1 |
The old hand said: "Just remember one sentence—containers find neighbors by name, host finds containers by localhost."
Common Issues Troubleshooting
| Symptom | Possible Cause | Solution |
|---|---|---|
| Exits immediately after startup | Missing environment variables | Check logs, complete environment variables |
| Page won't open | Security group port not opened | Open port in cloud provider console |
| Database connection failed | Wrong hostname | Replace localhost with container name |
| Build failure | Insufficient memory or Node version mismatch | Refer to "Prerequisite: Solution for Insufficient Memory" above to create Swap, or choose Node version matching your local environment |
Updating Deployment
After code updates, you don't need to go through the whole process again. Since the startup command already has git pull, simply click "Restart" in the "Websites - Runtime Environments" list, and the panel will automatically pull latest code, rebuild, and restart. If you need a complete rebuild due to issues, you can "Rebuild" the application in the "Installed" page—the panel will delete the container and recreate it based on current configuration, with persistent data preserved.
When Xiaoming first updated his code, he foolishly thought about SSHing in to do it manually. The old hand said: "The startup command already has git pull, just click 'Restart' in the panel. Only if you added new dependencies do you need to SSH in and run pnpm install once." The whole process took less than a minute, and the new version was live.
What if deployment fails?
If rebuild or restart fails to start the application, check the logs first—click the "Logs" button in the "Websites - Runtime Environments" list to view runtime logs. Most common causes are new code introducing new environment variables not configured in the panel, or dependency version conflicts. Logs usually have clear error messages.
Next step
Next.js application deployment is done. If your project is purely frontend (no backend), you can deploy using a simpler method—14.3.3 Deploying Static Websites.