Chapter 4: Essential Development Fundamentals You Need to Know
Preface
Before you start writing code, your mentor tells you there are still some key development fundamentals you need to understand first. These concepts won't directly teach you how to code, but they will help you understand how code actually runs on the internet.
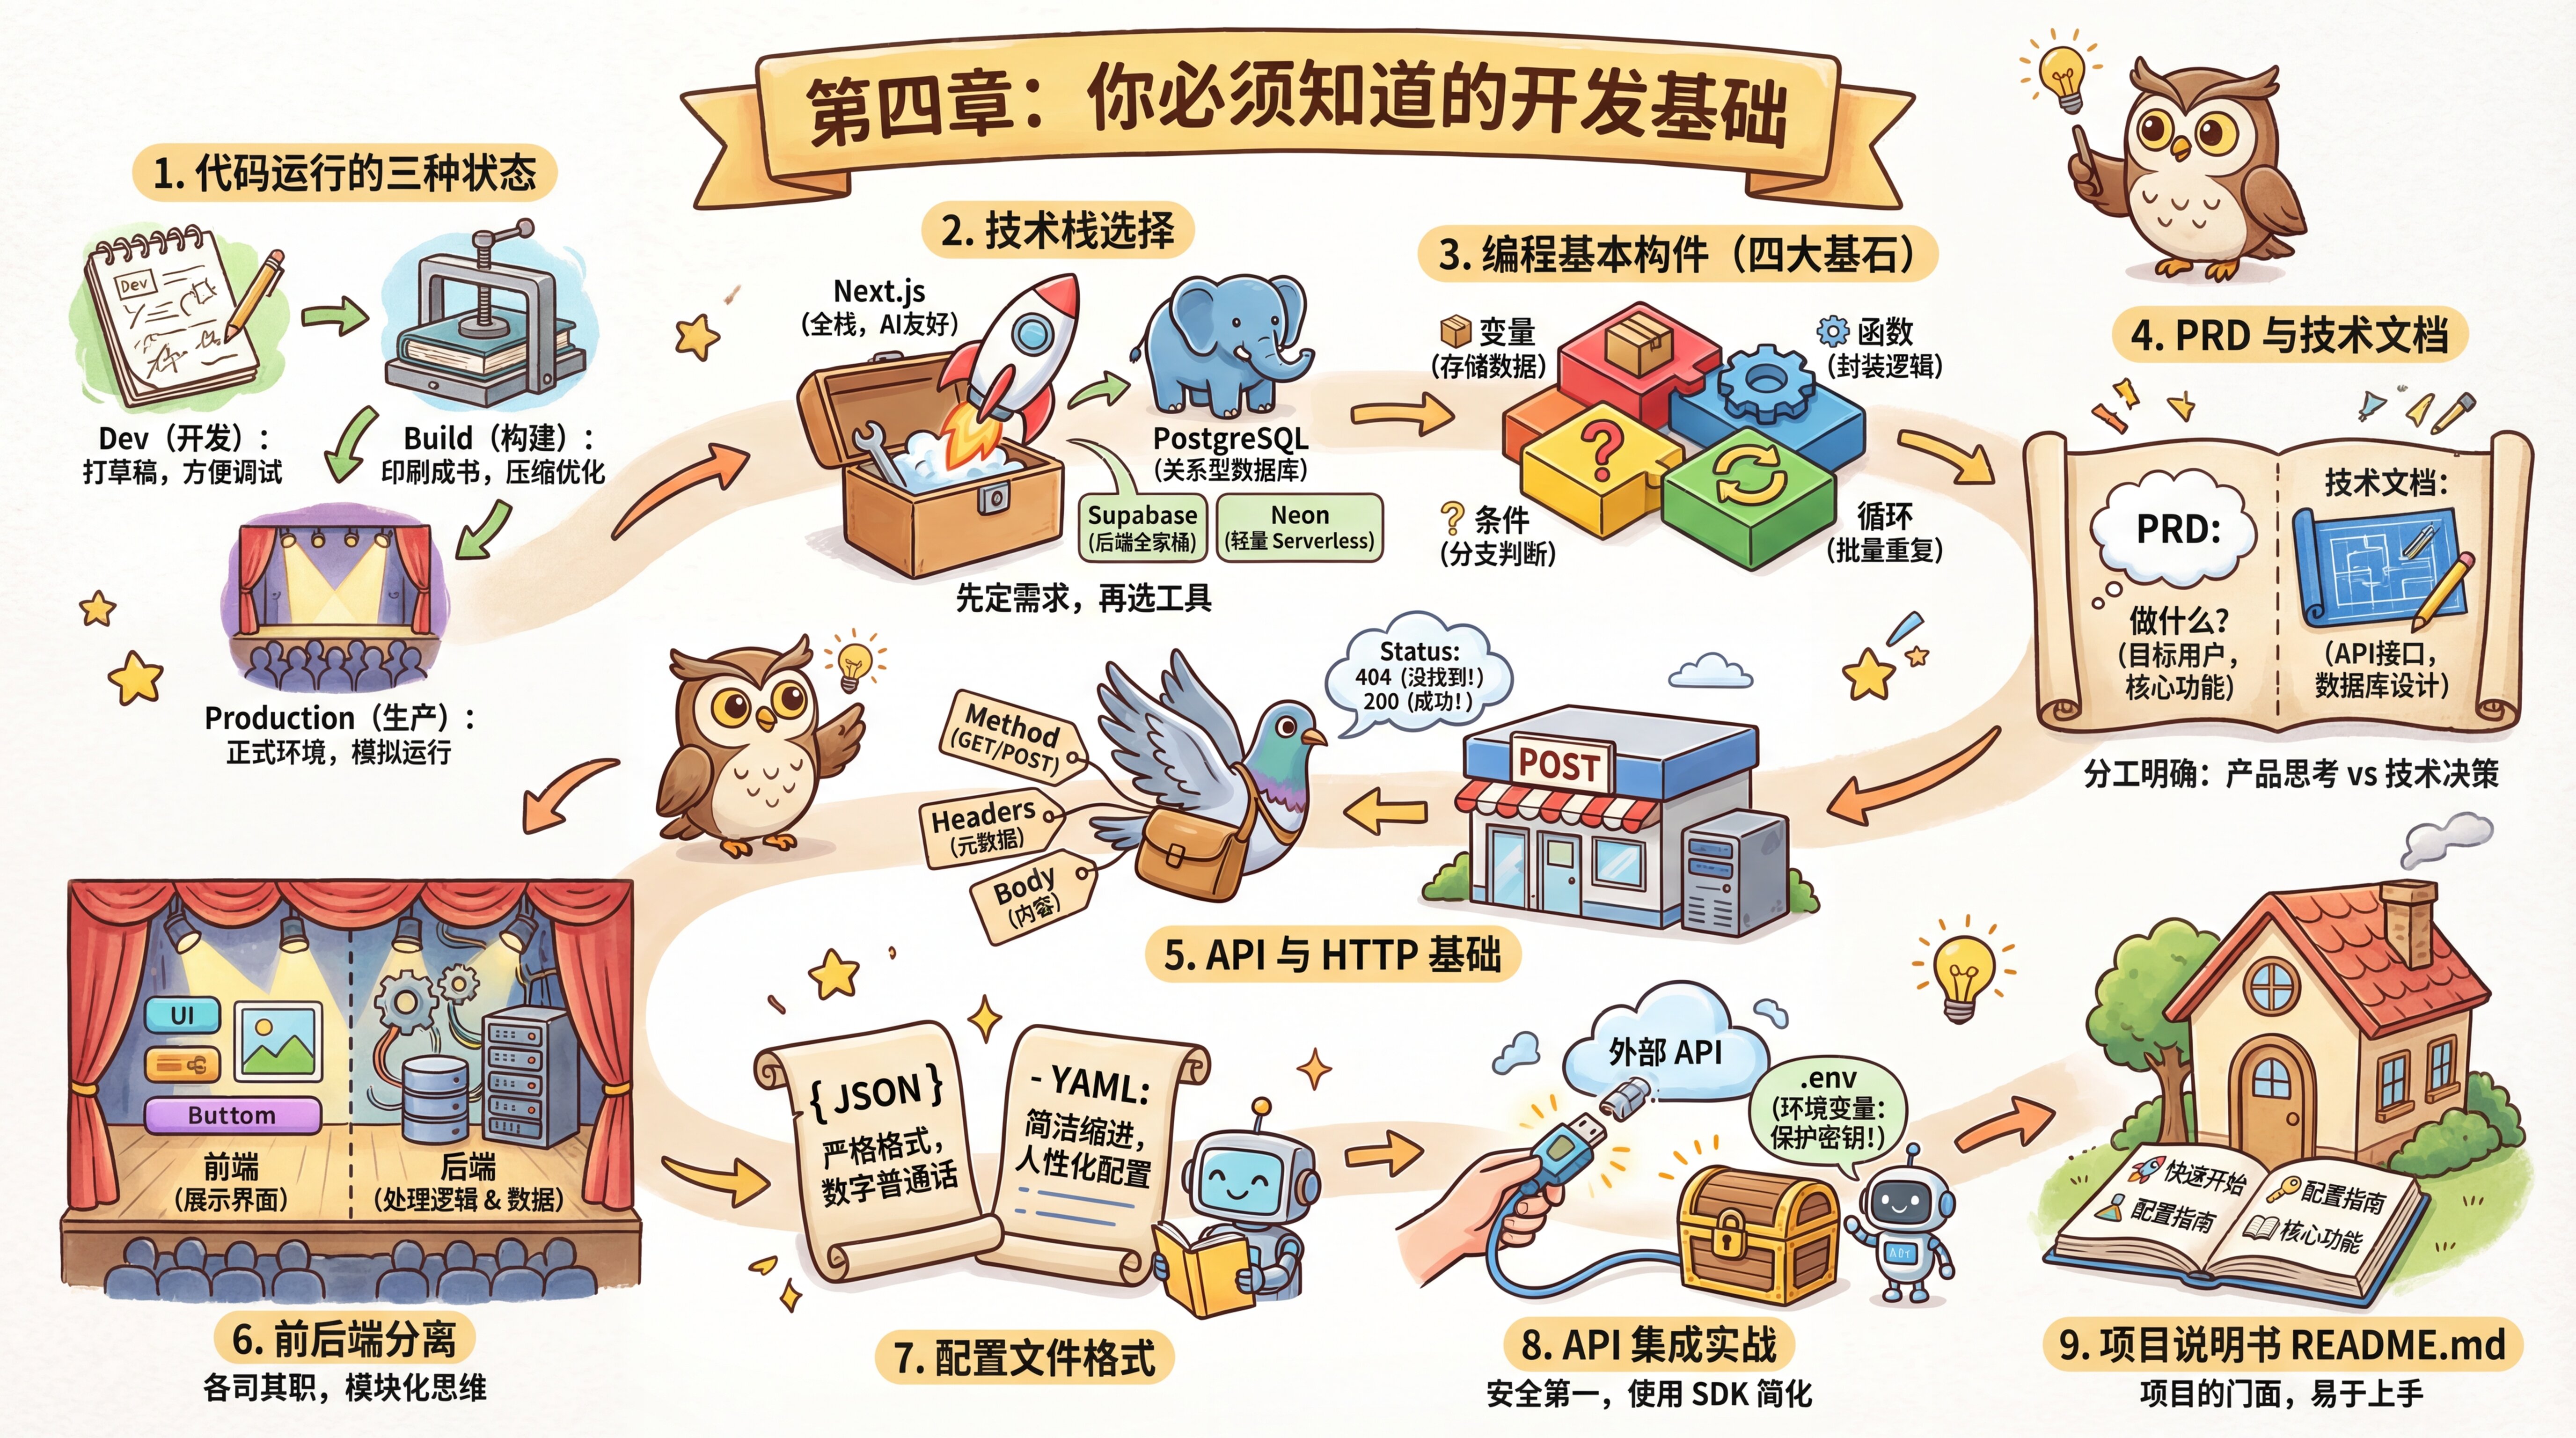
The Three States of Running Code
Your mentor first explains the "life cycle states" of code: Dev (Development), Build, and Production.
Dev mode is like drafting a document—after you save your code, the browser updates automatically, making debugging easier. Build mode is like turning that draft into a printed book by compressing and optimizing the code. Production mode simulates the real deployment environment by running the built version.
Understanding these three states can help you avoid a lot of confusion: for example, why your code changes don't seem to take effect (you might be in the wrong mode), or why other people can't view your local demo (Dev mode isn't suitable for demos).
4.0 The Three States of Running Code 🟢 - Understand the three runtime modes: Dev, Build, and Production
Choosing a Tech Stack
Tech stack decisions should be made after the PRD is finalized. Your mentor says: "First figure out what you want to build, then decide what to build it with."
With so many technology options out there, beginners often get stuck overthinking. But there's actually a simple decision-making framework: use full-stack Next.js (AI-friendly, mature ecosystem, easy deployment), and only consider Vite if your project is purely frontend; for the database, use PostgreSQL (relational + JSONB + pgvector, with strong extensibility).
Two ways to host a PostgreSQL database: Supabase and Neon are both cloud services for managed PostgreSQL, but they serve different purposes. Supabase provides a complete backend platform (authentication, storage, real-time subscriptions), making it great for rapid development; Neon focuses specifically on the database itself, is lightweight, and supports serverless architecture, making it better for scenarios where you need more backend customization. If you just want to focus on business logic, choose Supabase; if you need more flexible control, choose Neon.
PostgreSQL supports additional functionality through extensions, such as JSONB (for storing JSON data) and pgvector (for vector search, which requires installing the extension separately).
The core idea is "clarify requirements → evaluate complexity → choose the smallest viable solution," leaving room for future expansion without overengineering. In the AI era, the more unified your tech stack is, the more accurately AI can understand the context—and the higher your development efficiency will be.
4.1 Tech Stack Decision Framework 🟡 - Systematically choose the right tech stack
The Basic Building Blocks of Programming
Your mentor says that before you write code, you first need to understand what code is made of. Just like you need to recognize words before writing an article, programming also has its own "basic alphabet"—variables, functions, conditions, and loops. All programming languages, no matter how different their syntax may be, are built on these four core concepts. Variables store data, functions encapsulate reusable logic, conditions allow programs to respond differently based on different situations, and loops let programs handle repetitive tasks in batches. These four concepts form the foundation of Turing completeness—any computable problem can be solved through combinations of them.
4.3 How to Read AI-Generated Code 🟢 - Understand the four core concepts of code
The Relationship Between PRDs and Technical Documentation
After the PRD has gone through 5 iterations and the product plan is mostly finalized, your mentor reminds you that in addition to organizing the business logic, you also need to document the specific technical implementation plan—that is, the technical documentation.
Many people tend to confuse PRDs with technical documentation, but their roles are actually very clear:
A PRD (Product Requirements Document) answers the question of "what to build":
- Who are the target users?
- What are the core features?
- How will users interact with it?
- How should edge cases be handled?
Technical documentation answers the question of "how to build it":
- What tech stack should be used? (Next.js + PostgreSQL)
- How should the database schema be designed? (user table, post table, comment table)
- How should the API interfaces be defined? (
/api/auth,/api/posts) - How should third-party services be integrated? (AI API, map services)
- What is the deployment plan? (Edgeone, Vercel, cloud server)
Your mentor says: "At your current stage, there's no need to be rigid about format. You can absolutely merge the technical documentation and PRD into one document and simply call it project documentation, which makes it easier to look up. But you should still clearly distinguish between product-level thinking and technical-level decisions."
4.2 From PRD to Technical Documentation 🟢 - Understand the division of responsibility between product docs and technical docs
API and HTTP Basics
Seeing your curious expression, your mentor explains the underlying principles of frontend-backend communication. He says HTTP is like a remote instruction system for getting things done—the browser sends standardized instructions to the server, the server processes them, and then sends the result back. Each instruction contains four parts: the request method (GET/POST/PUT/DELETE, etc., indicating what operation to perform), the URL (the address of the resource), Headers (metadata such as authentication), and the Body (the data being sent). Understanding these four parts helps you diagnose issues faster: a 401 means unauthenticated (you need to log in), 403 means forbidden (you're logged in but don't have permission), and 404 means the resource doesn't exist (wrong address or deleted resource). AI can help handle the details, but only understanding the fundamentals allows you to troubleshoot effectively.
4.4 API and HTTP Basics 🟢 - Master how APIs and the HTTP protocol work
The Concept of Frontend-Backend Separation
While learning about HTTP communication, your mentor first explains the concepts of frontend and backend.
Frontend is the interface users see and interact with—the code that runs in the browser. The buttons, input fields, images, and text you see on a webpage are all rendered by the frontend. When you click a button or type something, the frontend code responds.
Backend is the code on the server that handles data and logic. Users don't see it, but it is responsible for processing requests sent by the frontend—for example, querying the database, verifying identity, or calling other services. After processing is complete, the backend returns the result to the frontend, which then displays it to the user.
In the past, frontend and backend were usually two separate projects, written in different languages and maintained by different teams. Now, with a full-stack framework like Next.js, both frontend and backend code can live in the same project and be written in the same language (JavaScript/TypeScript), but their responsibilities haven't changed: the frontend is responsible for "presentation," and the backend is responsible for "processing."
When planning features, you run into two issues that must be considered in advance: you want to build a user system, which involves authentication; and you want to build map features, which involve external APIs. Your mentor reminds you not to cram all your code into a single file—you need to learn to split functionality into different modules, such as auth (authentication), api (interfaces), and components (components). This kind of modular thinking is the key to keeping a project maintainable over time.
4.5 The Concept of Frontend-Backend Separation 🟢 - Understand the architecture and interaction model of frontend-backend separation
Configuration File Formats
While writing technical documentation and configuring your project, you also come across those oddly named configuration file formats like JSON and YAML.
JSON is like a strictly structured way of expressing data. It uses curly braces {} for objects, square brackets [] for arrays, and organizes data as "key: value" pairs. You can think of JSON as the lingua franca of the digital age—a universal language for communication between different programming languages and systems.
YAML, on the other hand, is a more human-friendly configuration format. It doesn't use brackets, but instead uses indentation to represent hierarchy, making it more concise to write. Many configuration files (such as some CI/CD configs) use YAML format.
It turns out that for AI, compared to loose natural language, these clearly structured formats are the "manuals" they prefer to read most.
4.6 Configuration File Formats 🟢 - Understand JSON and YAML configuration formats
Hands-On API Integration
You want to integrate AI capabilities or services like maps. Your mentor tells you that integrating an external API involves six steps: obtain credentials, choose an SDK, configure environment variables, write a minimal test, archive the reference documentation, and handle common errors.
Your mentor gives you one specific warning: always store your API Key in the .env environment variables file, instead of hardcoding it directly in your code. Environment variables are like a "firewall" between your code and your secrets.
For AI applications, your mentor recommends using the Vercel AI SDK. It provides the @ai-sdk/openai-compatible package, which can connect to any provider compatible with the OpenAI API format. You only need to learn one API specification, then change the baseURL, API Key, and model name to call mainstream large language models around the world.
Once your tests pass, remember to save the official documentation. The next time you ask AI to build a feature, just feed it the docs directly—the generated code will be more accurate.
4.7 Hands-On API Integration 🟢 - Integrate an external API from scratch
Project Manual README.md
Code isn't just for machines to run—it's also for people and AI to read. You learn that you need to write a README.md. This isn't redundant information; it's the project's "manual." In it, you clearly document how to start the project (pnpm dev), how to configure environment variables, and the logic behind the core features. From then on, anyone can get started just by reading the documentation.
README.md is like the "front door" of the project, and it typically includes: project overview, quick start, environment variables, core features, tech stack, and contribution guidelines.
4.8 Project Manual Structure 🟢 - Write a complete project README.md document
Learning Objectives
After completing this chapter, you will be able to:
- ✅ Understand the three states of running code
- ✅ Understand the decision-making framework for choosing a tech stack
- ✅ Distinguish between the roles of a PRD and technical documentation
- ✅ Understand the four basic building blocks of code (variables, functions, conditions, loops)
- ✅ Master the basic principles of the HTTP protocol
- ✅ Understand the concept of frontend-backend separation
- ✅ Learn how to integrate external APIs
- ✅ Understand JSON and YAML configuration formats
- ✅ Write a clear project README
- ✅ Develop modular thinking
Previous Chapter: Chapter 3: Product Thinking and Document-Driven Development
Next Chapter: Chapter 5: Interface (UI) and Interaction (UX)